Overview
TeaPet is a personal manager application for Form Teachers of Primary, Secondary and Tertiary institutions. The user interacts with it via a Command Line Interface (CLI) along with a Graphical User Interface (GUI) created with JavaFX. The application is written in Java.
Summary of contributions
-
Major enhancement: developed the Personal Schedule feature of TeaPet.
-
What it does: Allows the user to keep track of all of his/her events by adding it as an Event in the Personal Schedule.
-
Justification: This feature ensures our product to be an integrated platform that allows users to track events that they have to attend. We decided to integrate this feature into TeaPet because we feel that TeaPet should also be an application that helps the user manage their time, on top of its primary functions of managing the user’s class details. An integrated platform will ensure that our product will help the user save time by only using TeaPet, since using different applications to keep track of different things is a hassle.
-
Highlights: Users are able to add, edit and delete events scheduled in their personal scheduler. They can set recurring events and have different color codes to represent different event types. Users can export their schedule to an .ics file to import into Google Calendar and other mainstream calendar applications. Different view modes are also available for the Personal Schedule. The implementation was challenging as it required me to study the implementation of the library.
-
Credits:
-
JFXtras iCalendar API was used to help develop our Personal Schedule.
-
Levenshtein distance formula was used to help us decide the similarity of event names that helped us built a recommendation system.
-
-
-
Minor enhancements:
-
Ensured code naming is coherent within the project.
-
Ensured product looks coherent by removing AddressBook code in documents.
-
-
Code contributed: [Functional and Test code]
-
Other contributions:
-
Project management:
-
In charge of Integration, ensured product does not have bugs when features are merged together.
-
Cleaned up code base, removed unused code.
-
-
Enhancements to existing features:
-
Documentation:
-
Community:
-
Reported bugs and suggestions for other teams in the class (examples: Practical Exam Dry Run)
-
Contributions to the User Guide
Given below are sections I contributed to the User Guide. They showcase my ability to write documentation targeting end-users. |
Overview of Features
This section will provide you a brief overview of TeaPet’s cool features and functionality for you to better familiarise yourself with TeaPet.
-
Manage your students easily
-
Include student’s particulars. e.g. address, contact number, next of kin (NOK).
-
Include administrative details of the students. e.g. attendance, temperature.
-
-
Manage your class academic progress easily
-
Include students' grades for homework and examinations.
-
Easy to track progress using helpful tools. e.g. tables, export tools.
-
-
Add Notes to act as lightweight, digital reminders easily
-
Include reminders for yourself to help you remember important information.
-
Search keywords in your notes.
-
Save the notes as administrative or behavioural.
-
-
Plan your schedule easily
-
Create and manage your events with a single calendar.
-
View calendar at a glance.
-
-
Data is saved onto your hard disk automatically
-
Any changes made will be saved onto your computer so you don’t have to worry about data being lost.
-
Contributions to the Developer Guide
Given below are sections I contributed to the Developer Guide. They showcase my ability to write technical documentation and the technical depth of my contributions to the project. |
Personal Schedule feature
The Personal Schedule feature enables teachers to record down their events in their personal scheduler, which will be sorted accordingly to date and time. Different view modes are available to enable the teachers to easily view their schedule.
This feature is built based on the Jfxtras iCalendarAgenda library. The iCalendarAgenda object is used on the UI side to render VEvents. The VEvent object takes in data such as event name, start date time, end date time, recurrence of events, etc.
| VEvent object is used primarily throughout the feature as it is the required object type for the iCalendarAgenda library. Hence, at the storage level, the Event objects are mapped to VEvents for reading purposes and vice versa for saving purposes. |
The Personal Schedule feature allows the user to track and manage their events. The schedule feature consists of eight commands namely:
-
EventDisplayCommand- Displays all events in the current week. -
EventAddCommand- Creates a new event in the scheduler. -
EventEditCommand- Edits the details of an event in the scheduler. -
EventDeleteCommand- Deletes the specified event from the scheduler. -
EventIndexCommand- Obtain the index of the specified event. -
EventIndexAllCommand- Obtain all the indexes of all the events in the scheduler. -
EventViewCommand- Changes the view mode of the scheduler. -
EventExportCommand- Exports the event details into an .ics file.
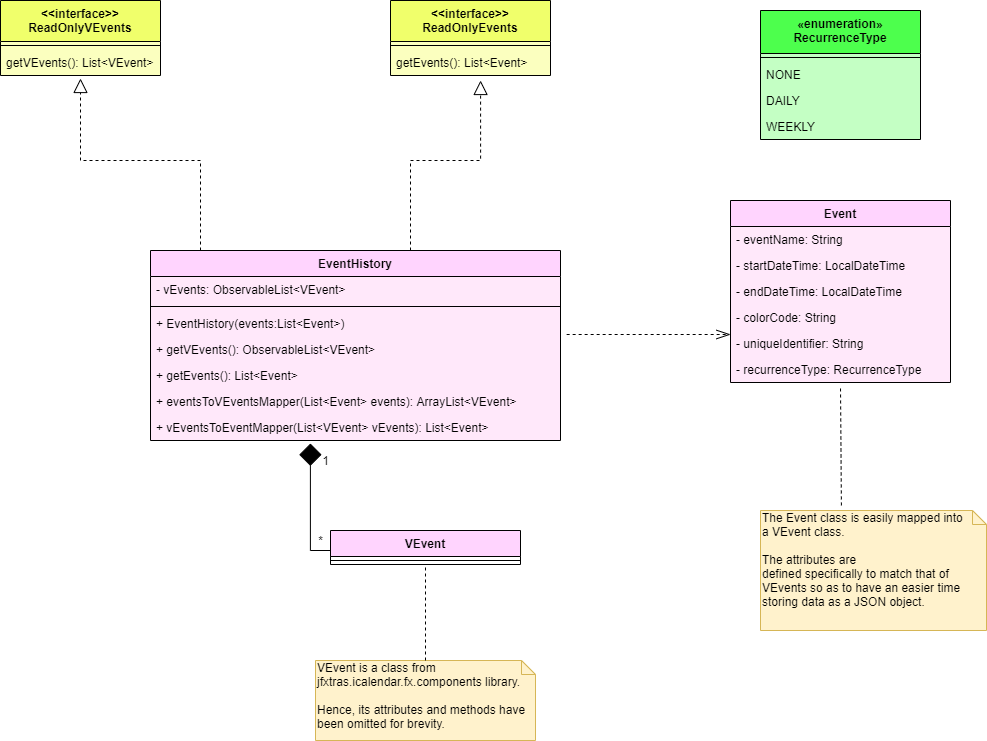
Class Overview
The class diagram below shows the structure of Event classes in the Model. Notice how the EventHistory class depends
on the Event class in its constructor but only has a VEvent attribute. This is because an Event object will always be
mapped to a VEvent within the EventHistory class. Some methods of EventHistory has been omitted for brevity as they are
mostly VEvent based, which then again highlights that the interactions with the Logic and UI components are mostly done
using the VEvent type class. Only the Storage component works with Event type class.
Schedule Display Command
Implementation
The following is a detailed explanation of the operations which EventDisplayCommand performs.
Format for displaying the schedule is schedule.
|
Step 1: The EventDisplayCommand#execute(Model model) method is executed and it updates the current model using the method
Model#setEventScheduleLocalDateTime(LocalDateTime localDateTime). LocalDateTime#now() is used to obtain the current LocalDateTime
and used as the parameter in Model#setEventScheduleLocalDateTime(LocalDateTime localDateTime).
Step 2: The EventSchedulePrefs#localDateTime is then updated with the current LocalDateTime.
Step 3: The CommandBox will be reflected with the EventDisplayCommand#MESSAGE_SUCCESS constant and
a new CommandResult will be returned with the message.
Aspect: Product cohesiveness
-
Current Implementation:
-
schedule -
Our team chose to use the one-word command
scheduleas the rest of our features also use one-word commands. This is so that our features look like one integrated product and not an application with several features.
-
-
Alternatives Considered:
-
schedule view -
If this was the implementation that we used, it can get quite confusing to other users as to why the
academicscommand works to change the scene to display the academics whilst to look at the schedule, one must enter inschedule view.
-
Schedule Add Command
Implementation
The following is a detailed explanation of the operations which EventAddCommand performs.
Format for adding an event to the schedule is schedule add eventName/EVENT_DESCRIPTION startDateTime/YYYY-MM-DDTHH:MM
endDateTime/YYYY-MM-DDTHH:MM recur/RECUR_DESCRIPTION color/COLOR_CODE
|
RECUR_DESCRIPTION can only take the values none, daily or weekly.
|
COLOR_CODE can only take the values 1-23.
|
Step 1: The EventAddCommand#execute(Model model) method is called which validates if the VEvent object from
the parser is valid.
Step 2: The method Model#addVEvent(VEvent vEvent) is then called which adds the new VEvent to the EventHistory.
The VEvent is validated to check if it is unique using the EventUtil#isEqualVEvent(VEvent vEvent) method.
Step 3: If the event is invalid, a CommandException will be thrown with an error message.
Step 4: The CommandBox will be reflected with the formatted EventAddCommand#MESSAGE_SUCCESS constant with the summary of the VEvent and
a new CommandResult will be returned with this same formatted message.
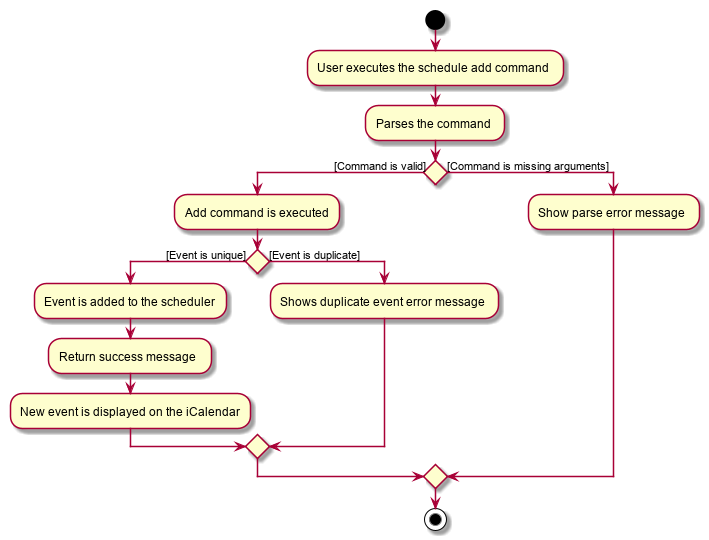
The following activity diagram summarizes what happens when a user executes the schedule add command:
Aspect: Command Clarity
-
Current Implementation:
-
schedule add eventName/Consultation startDateTime/2020-04-08T09:00 endDateTime/2020-04-08T11:00 recur/none color/13 -
We currently have full names for prefixes such as eventName/ instead of name/, as well as slightly lengthier prefixes such as startDateTime/ and endDateTime/. Although this may be slightly more tedious, we believe that it is clearer as there are other very similar prefixes in our other features such as name/ and date/.
-
-
Alternatives Considered:
-
schedule add name/Consultation startDateTime/2020-04-08T09:00 endDateTime/2020-04-08T11:00 recur/none color/13 -
By doing this, users may be confused as the Academics feature, Student feature and Notes feature require name as a prefix as well. Furthermore, the name required here is not the name of the student but the name of the event.
-
Schedule Edit Command
Implementation
The following is a detailed explanation of the operations which EventEditCommand performs.
Format for editing an event in the schedule is schedule edit INDEX [eventName/EVENT_DESCRIPTION] [startDateTime/YYYY-MM-DDTHH:MM]
[endDateTime/YYYY-MM-DDTHH:MM] [recur/RECUR_DESCRIPTION] [color/COLOR_CODE]
NOTE: INDEX is the index of the event. Which can be obtained by the indexGet Command. See below for more information.
|
RECUR_DESCRIPTION can only take the values none, daily or weekly.
|
COLOR_CODE can only take the values 1-23.
|
| All fields are optional, however at least one field needs to be entered to edit. |
Step 1: The EventEditCommand#execute(Model model) method is executed which edits the details of the specified
VEvent in the model. This method checks if the index defined when instantiating
EventEditCommand(Index index, EditVEventDescriptor editVEventDescriptor) is valid. This method also checks if
the editVEventDescriptor is valid.
Since the fields are optional, the fields not entered by the user will reuse the existing values that are currently stored and defined
in the VEvent object.
| Index must be a positive number greater than zero. |
At least 1 field of event needs to be provided to editVEventDescriptor to edit.
|
Step 2: A new VEvent with the newly updated values will be created which replaces the existing VEvent
object in the current model using the Model#setVEvent(Index index, VEvent vEvent); method. The values input to editVEventDescriptor
are then validated and if the values are not valid, an IllegalValueException will be thrown.
Step 3: The newly created VEvent is then validated. If the newly created VEvent is the same as any of the events in the scheduler
or it has not been edited, a CommandException will be thrown.
Step 4: The new created VEvent is then mapped to an Event and the LocalDateTime of this VEvent is used to update
EventSchedulePrefs#localDateTime using the method Model#setEventScheduleLocalDateTime(LocalDateTime localDateTime).
Step 5: EventEditCommand#generateSuccessMessage(VEvent vEvent) formats the success message with
EventEditCommand#MESSAGE_EDIT_EVENT_SUCCESS , the Index of the event and the VEvent.
Step 6: The command box will be reflected with the success message and a new
CommandResult will be returned with the message.
Schedule Delete Command
Implementation
The following is a detailed explanation of the operations which EventDeleteCommand performs.
Format for deleting an event in the schedule is schedule delete INDEX.
|
| INDEX is the index of the event. Which can be obtained by the indexGet Command. See below for more information. |
Step 1: The EventDeleteCommand#execute(Model model) method is executed which deletes the specified
VEvent in the model. This method checks if the targetIndex defined when instantiating
EventDeleteCommand(Index targetIndex) is valid.
| Index must be a positive number greater than zero and within the bounds of the number of events in the scheduler. |
Step 2: The VEvent at the specified targetIndex is then removed from EventHistory#VEvents
using the Model#delete(Index index) method.
Step 3: EventDeleteCommand#generateDeleteSuccessMessage(VEvent vEvent) formats the success message with
EventDeleteCommand#MESSAGE_SUCCESS and the VEvent.
Step 4: The command box will be reflected with the success message and a new
CommandResult will be returned with the message.
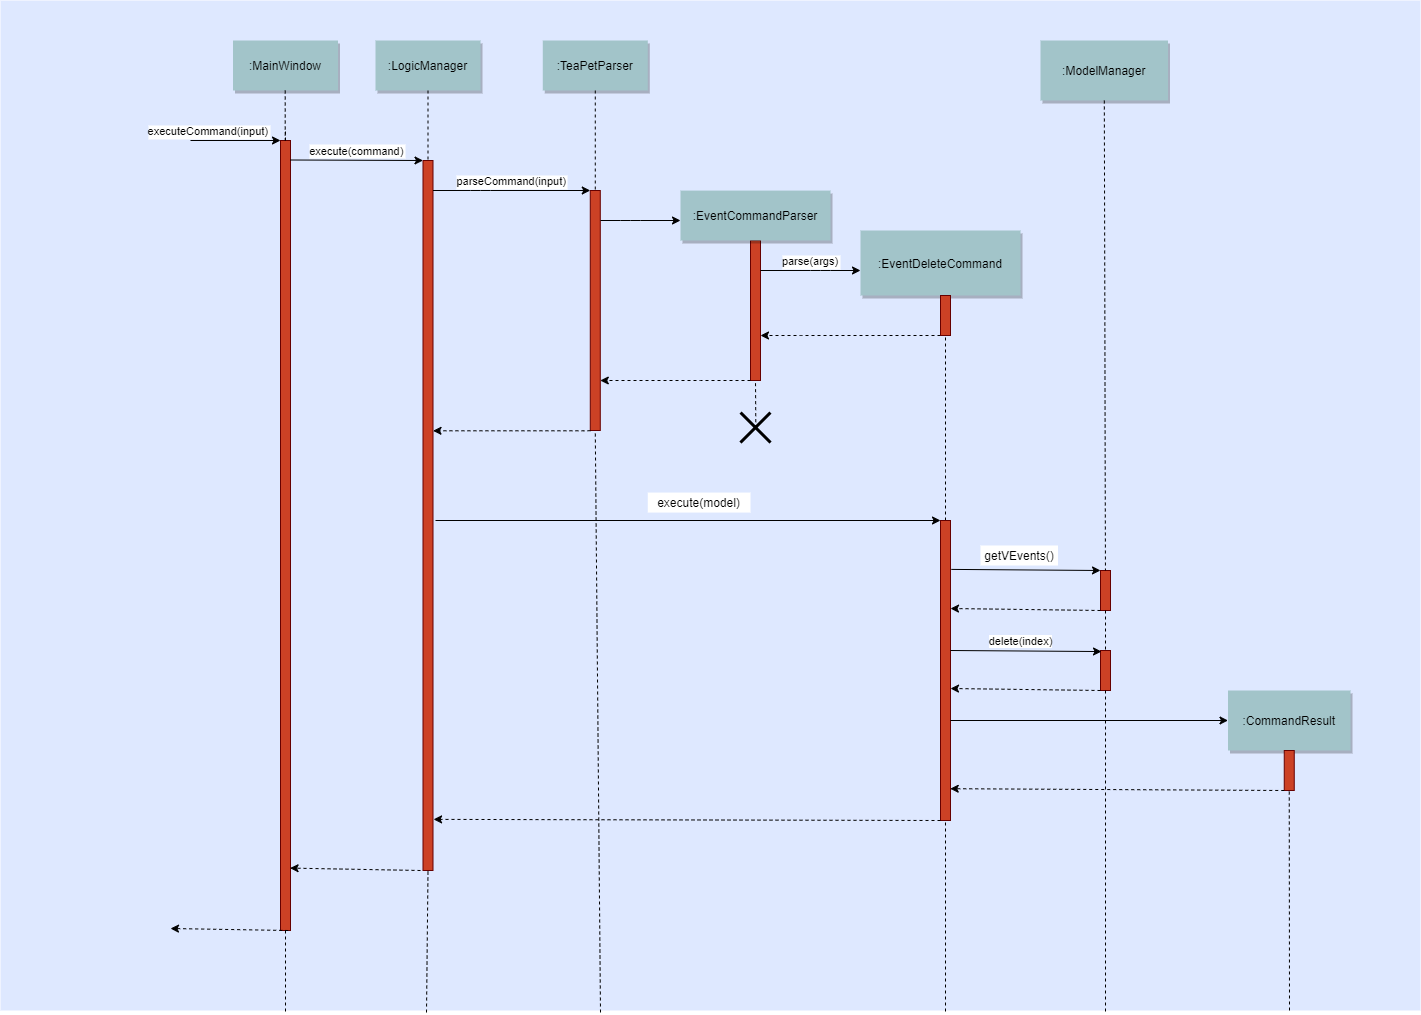
The following sequence diagram will provide a clearer picture on how the EventDeleteCommand works.
Schedule Index Command
Implementation
The following is a detailed explanation of the operations which EventIndexCommand performs.
This command returns the index of the Event(s) with same EVENT_DESCRIPTION as the eventName input from the user.
If there are no Events with the same EVENT_DESCRIPTION, the Event with the most similar EVEnT_DESCRIPTION, calculated
using the Levenshtein Distance formula, will then be suggested.
Format for getting the index of an event in the schedule is schedule indexGet/EVENT_DESCRIPTION.
|
EVENT_DESCRIPTION is the name of the event.
|
Step 1: The EventIndexCommand#execute(Model model) method is executed which obtains the index of the specified
VEvent in the model. This method first obtains the current list of Pair of Index and VEvents in EventHistory#vEvents using
Model#searchVEvents(String eventName).
Step 2: The current list of Events is then validated.
-
If the list of Events is empty, the method will find the most similar
EventinEventHistory#vEventsbased on theeventNameentered when when instantiatingEventIndexCommand(String eventName). The foundVEventis then mapped to an Event and theLocalDateTimeof thisVEventis used to updateEventSchedulePrefs#localDateTimeusing the methodModel#setEventScheduleLocalDateTime(LocalDateTime localDateTime).VEventNotFoundExceptionis thrown when there are no events in the schedule at all. -
If the list of Events is not empty, The first
VEventof the list of Events is then mapped to an Event and theLocalDateTimeof thisVEventis used to updateEventSchedulePrefs#localDateTimeusing the methodModel#setEventScheduleLocalDateTime(LocalDateTime localDateTime).
Step 3: EventIndexCommand#generateSuggestionMessage(Pair<Index, VEvent> resultVEventPair) or EventIndexCommand#generateResultMessage(List<Pair<Index, VEvent>> pairVEventIndexList)
will then format the message according to whether there the list of Events is empty.
-
If the list of Events is empty, the method
EventIndexCommand#generateSuggestionMessage(Pair<Index, VEvent> resultVEventPair)will be called. -
If the list of Events is not empty, the method
EventIndexCommand#generateResultMessage(List<Pair<Index, VEvent>> pairVEventIndexList)will be called.
Step 4: The command box will be reflected with the message and a new
CommandResult will be returned with the message.
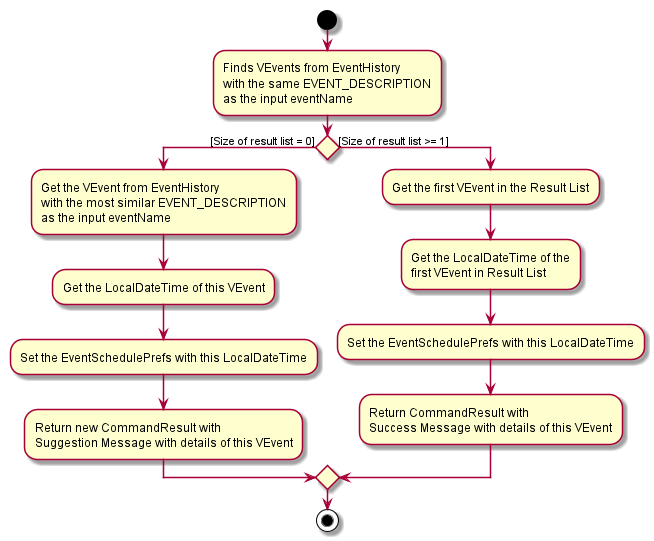
The following Activity Diagram will provide a clearer picture on how the EventIndexCommand is supposed to run.
Schedule IndexAll Command
Implementation
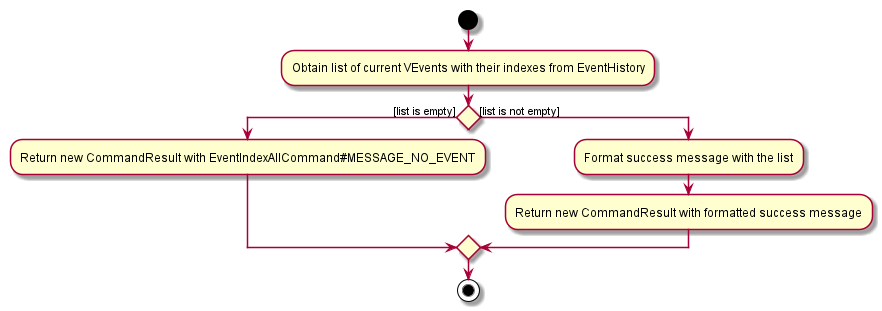
The following is a detailed explanation of the operations which EventIndexAllCommand performs.
Format for getting the indexes of all events is schedule indexAll.
|
Step 1: The EventIndexAllCommand#execute(Model model) method is executed which obtains all indexes of the all of VEvents in the model.
This method first obtains the current list of Pair of Index and VEvents in EventHistory#vEvents using
Model#getAllVEventsWithIndex().
Step 2: The current list is then validated. If the list is empty, a new CommandResult with message EventIndexAllCommand#MESSAGE_NO_EVENT
will be returned.
Step 3: The success message is generated using EventIndexAllCommand#generateResultMessage(List<Pair<Index, VEvent>> pairVEventIndexList)
and a new CommandResult will be returned with this message.
The following Activity Diagram will provide a clearer picture on how the EventIndexAllCommand is supposed to run.
Schedule View Command
Implementation
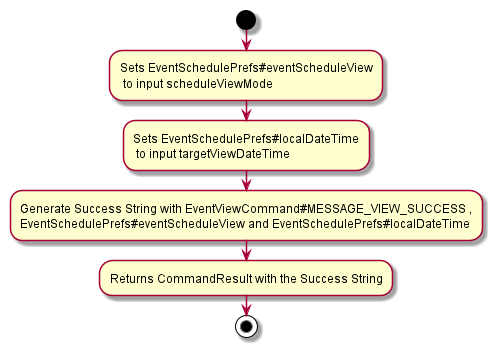
The following is a detailed explanation of the operations which EventViewCommand performs.
Format for changing the view mode of the schedule is schedule view mode/SCHEDULE_MODE date/YYYY-MM-DD.
|
SCHEDULE_MODE can only takes the values daily or weekly. Any other values will result in an error thrown.
|
| Date must be entered in YYYY-MM-DD format. Any other values will result in an error thrown. |
Step 1: The EventViewCommand#execute(Model model) method is executed which changes the view mode of the model.
This method sets EventSchedulePrefs#eventScheduleView and EventSchedulePrefs#localDateTime
with EventViewCommand#scheduleViewMode and EventViewCommand#targetViewDateTime respectively.
Step 2: The success message is generated using EventViewCommand#generateSuccessMessage(EventScheduleView eventScheduleViewMode, LocalDateTime targetViewDate)
and a new CommandResult will be returned with this message.
The following Activity Diagram will provide a clearer picture on how the EventViewCommand is supposed to run.
Schedule Export Command
Implementation
The following is a detailed explanation of the operations which EventExportCommand performs.
Format for exporting the schedule into an .ics file is schedule export.
|
Step 1: The `The EventExportCommand#execute(Model model) method is executed which exports the events in the scheduler into a .ics file in the data folder.
Step 2: The command box will be reflected with the EventExportCommand#MESSAGE_SUCCESS constant and a new CommandResult will be returned with the message.
Step 3: Subsequently, the CommandResult will be processed by the`MainWindow` in the UI component and generate a mySchedule.ics file in the data folder of the current directory.