By: CS2103T-W12-2 Since: Feb 2020 Licence: MIT
- 1. Introduction
- 2. Quick Start [Done By Gerren Seow]
- 3. Overview of Features
- 4. Features
- 4.1. Student Particulars [Done by Simon Lam]
- 4.2. Student Administration [Done by Zhang Yuanyu]
- 4.2.1. Displaying of the class’s last updated administrative information:
admin - 4.2.2. Displaying of the dates with administrative information of the class:
admin dates - 4.2.3. Fetching of administrative information of the class at the specified date:
admin fetch - 4.2.4. Saves today’s administrative information of the class:
admin save - 4.2.5. Deleting of administrative information of the class at the specified date:
admin delete
- 4.2.1. Displaying of the class’s last updated administrative information:
- 4.3. Student Academics [Done by Lee Hui Ting]
- 4.3.1. Display all Assessments and Academics Help:
academics - 4.3.2. Add Assessment:
academics add - 4.3.3. Edit Assessment:
academics edit - 4.3.4. Delete Assessment:
academics delete - 4.3.5. Submit Assessment:
academics submit - 4.3.6. Mark Assessment:
academics mark - 4.3.7. Filter Assessments by type:
academics homework/exam - 4.3.8. View Academics Report:
academics report - 4.3.9. Export Academics Report:
academics export
- 4.3.1. Display all Assessments and Academics Help:
- 4.4. Notes [Done by Gerren Seow]
- 4.5. Personal Scheduler [Done by Simon Lam and Gary Lim]
- 4.5.1. Display your scheduler:
schedule[Done by Simon Lam and Gary Lim] - 4.5.2. Adding an event to schedule:
schedule add[Done by Simon Lam and Gary Lim] - 4.5.3. Editing an event in schedule:
schedule edit[Done by Gary Lim] - 4.5.4. Delete an event in schedule:
schedule delete[Done by Gary Lim] - 4.5.5. Get index of an event in schedule:
schedule indexGet[Done by Gary Lim] - 4.5.6. Get all indexes of events in schedule:
schedule indexAll[Done by Gary Lim] - 4.5.7. Change view mode of schedule:
schedule view[Done by Gary Lim] - 4.5.8. Export all events in schedule:
schedule export[Done by Gary Lim]
- 4.5.1. Display your scheduler:
- 4.6. Additional Features [Done by Simon Lam]
- 5. Command Summary
- 6. Glossary [Done by Zhang Yuanyu]
- 7. FAQ [Done by Zhang Yuanyu]
1. Introduction
1.1. About TeaPet
Greetings, and welcome to TeaPet!
Looking for an all-in-one solution for your teaching needs? Look no further!
TeaPet is an integrated platform fully customized for Form Teachers in Primary, Secondary and Tertiary institutions, with the aim of helping you manage your classroom effectively. The application allows you to keep track of your students' personal particulars, daily administration, behavioural notes and academic progress with a few simple commands. Furthermore, TeaPet also comes with an in-built personal scheduler to help with your weekly planning needs. It looks like you’ll never have to worry about missing your next coffee appointment anymore!
All your important information is comfortably compartmentalized on our simple and clean Graphical User Interface (GUI). We are optimized for users who are very comfortable working on the Command Line Interface (CLI).
Are you are looking for a way to easily manage your administrative classroom matters and have quick fingers? If so, then TeaPet is definitely for you!
Explore this User Guide to find out more. Enjoy!
1.2. Navigating the User Guide
The aim of this User Guide is to provide you with all the information you need to fully utilise TeaPet. We understand the pains of using a Command Line Interface (CLI) program and have bested our efforts into ensuring a very readable guide on how to use our program.
If you need help setting up TeaPet, you can go to the Section 2, “Quick Start [Done By Gerren Seow]” section.
If you want to find out more about TeaPet’s features and commands, you can go to the Section 4, “Features” section.
If you need an overview regarding the usage of TeaPet’s commands, head on to the Section 5, “Command Summary” section.
Take note of the following symbols and formatting used in this document:
Symbol/ |
Meaning |
||
Enter |
This symbol indicates the enter button on the keyboard. |
||
|
A grey highlight indicates that this is a command that can be executed by the program. Some
|
||
|
|||
|
|||
|
|||
2. Quick Start [Done By Gerren Seow]
This section will serve to explain the various components of the TeaPet, which you can interact with. You can also follow our step-by-step guide on how to install the application into your Computer. Quickly now, let’s get started!
2.1. TeaPet’s Layout
TeaPet’s User Interface can be divided into 5 main components, each performing a specific functionality.
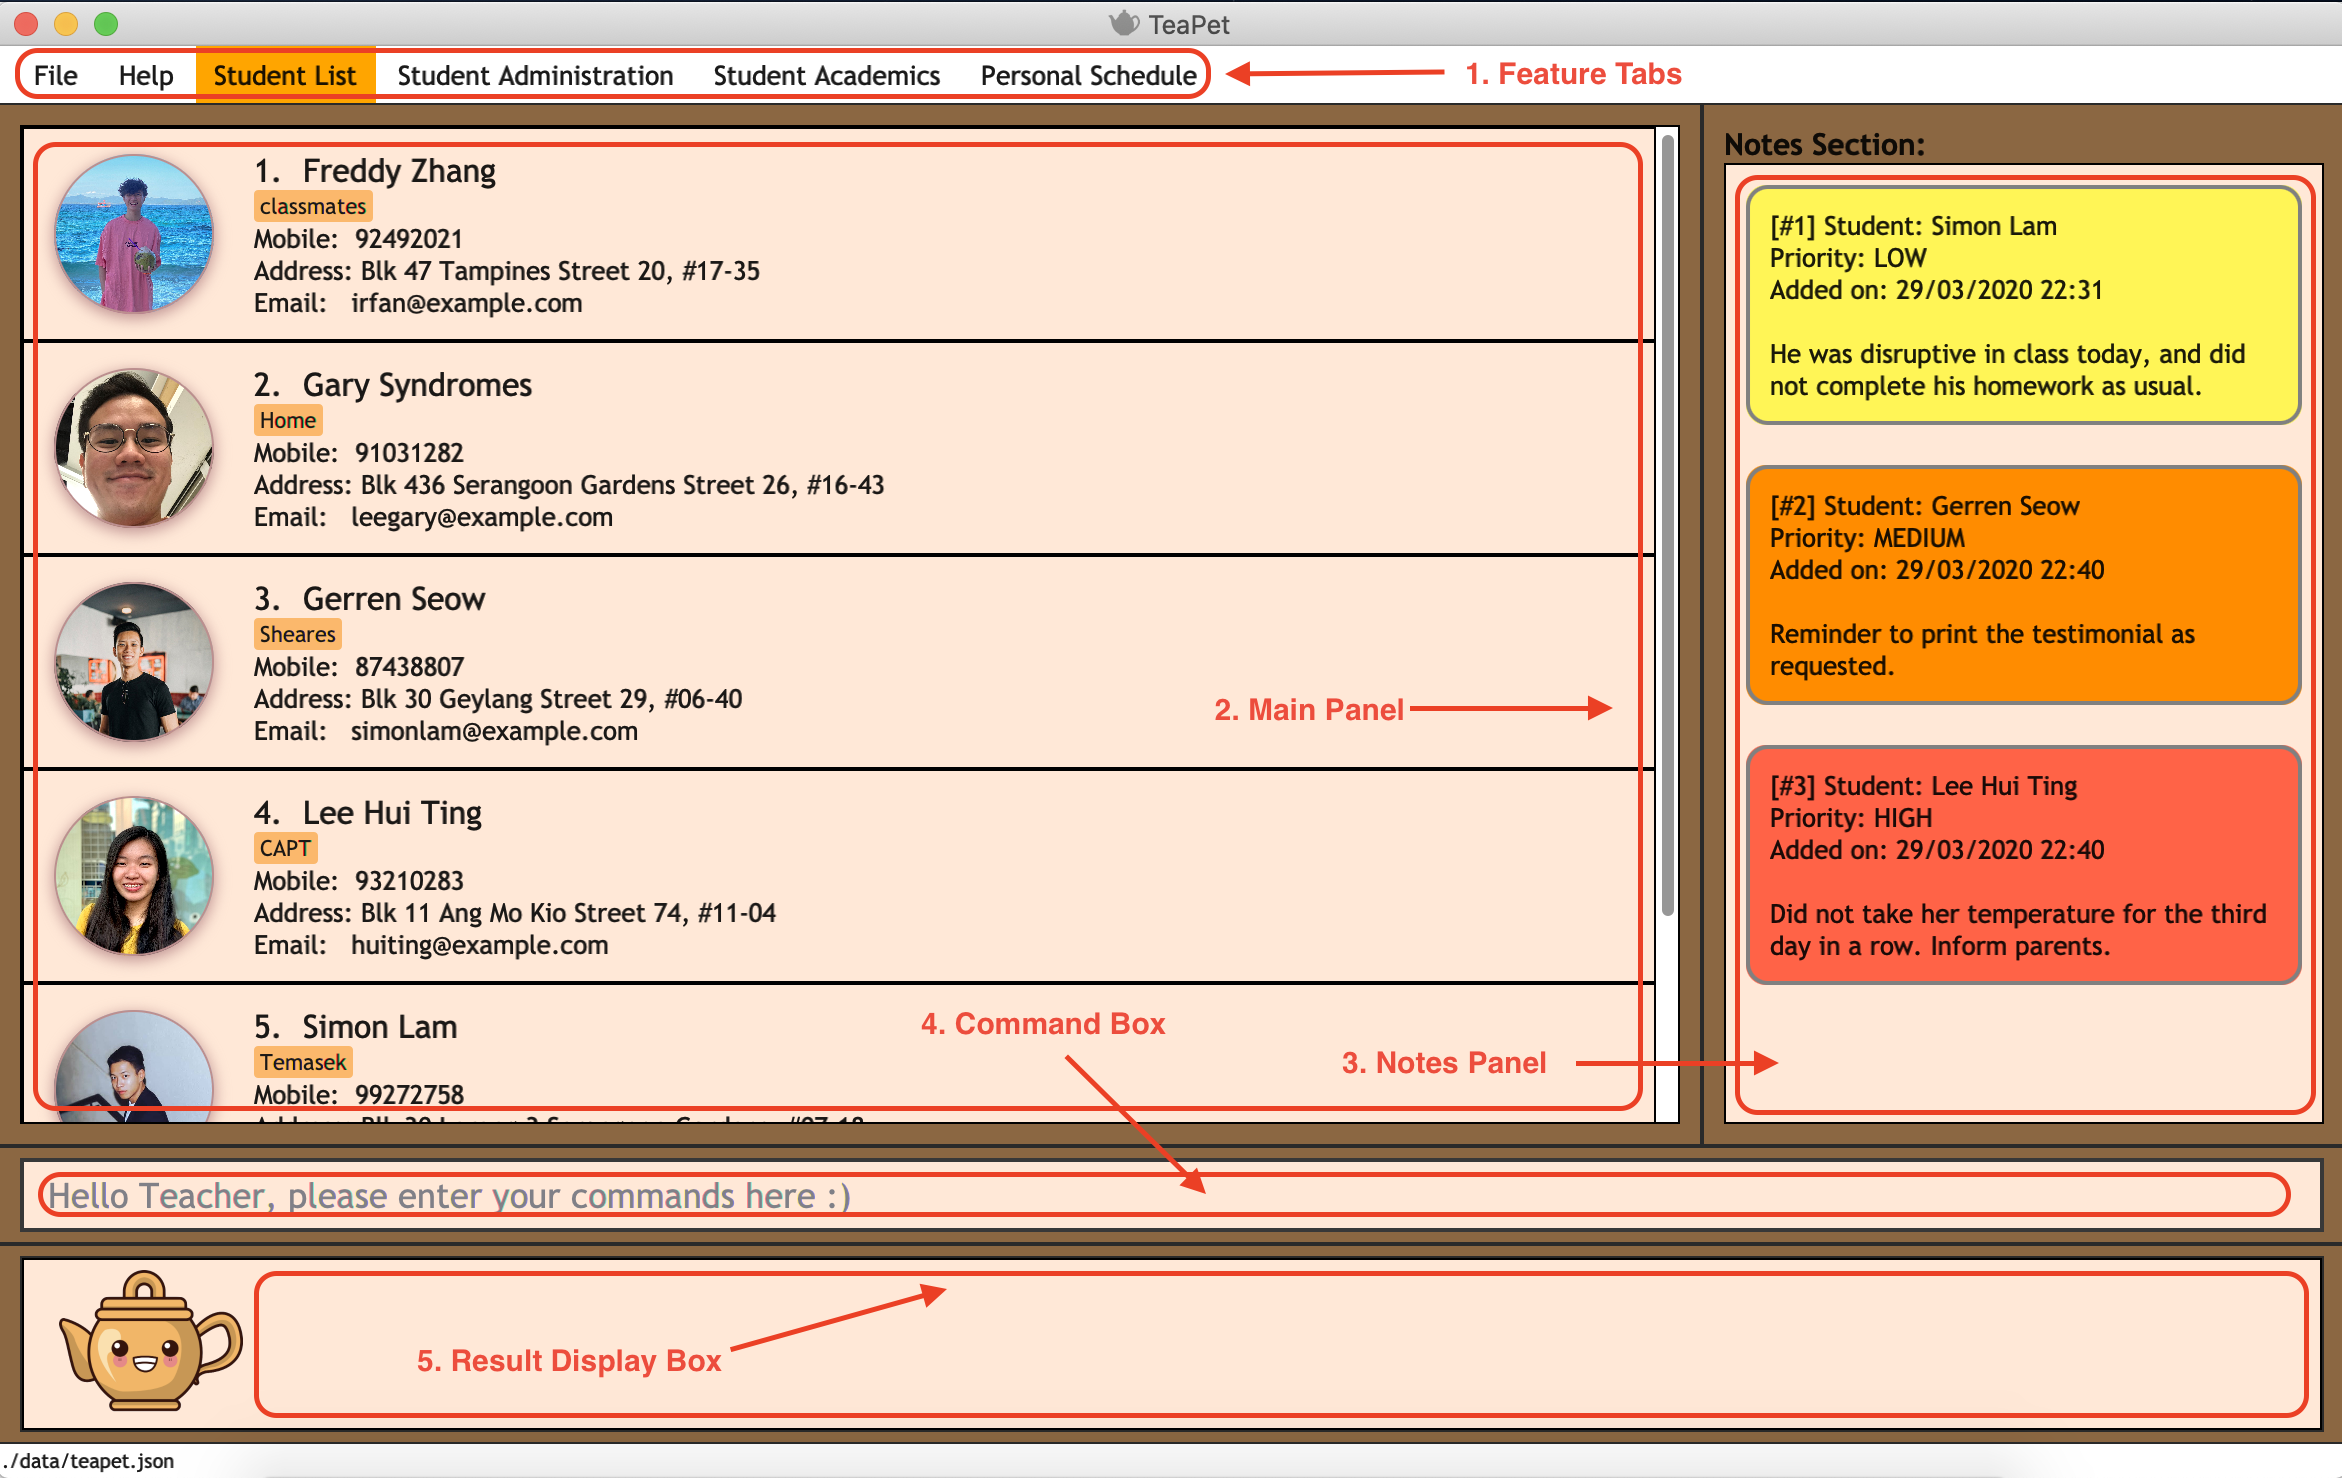
-
Feature Tabs
These tabs display some of TeaPet features so that you tell easily which section of TeaPet you are in. There is a drop-down menu in each tab to select and perform various feature functionality, if you intend to use your mouse instead of the command line to access the features. -
Main Panel
The main panel is the display window of Student List, Student Administration, Student Academics and Personal Schedule information. Depending on which feature you are currently using, the main panel will display corresponding information. -
Notes Panel
The notes panel is specifically used to displays all the notes stored in TeaPet. -
Command Box
The command box is where you will be entering commands into TeaPet. -
Result Display Box
The result display box is where TeaPet’s server replies to every command input. Any success, error or information messages will be displayed in this box.
2.2. Installation
The details below indicate the step-by-step process on getting started with TeaPet.
-
The Computer you are using should either be of Windows or Mac operating system.
-
Ensure you have Java 11 or above installed in your Computer.
-
Download the latest TeaPet.jar here.
-
Copy the TeaPet.jar file to the folder you want to use as the root directory for TeaPet.
-
Double-click the file to start the app. The Graphical User Interface (GUI) should appear in a matter of seconds.
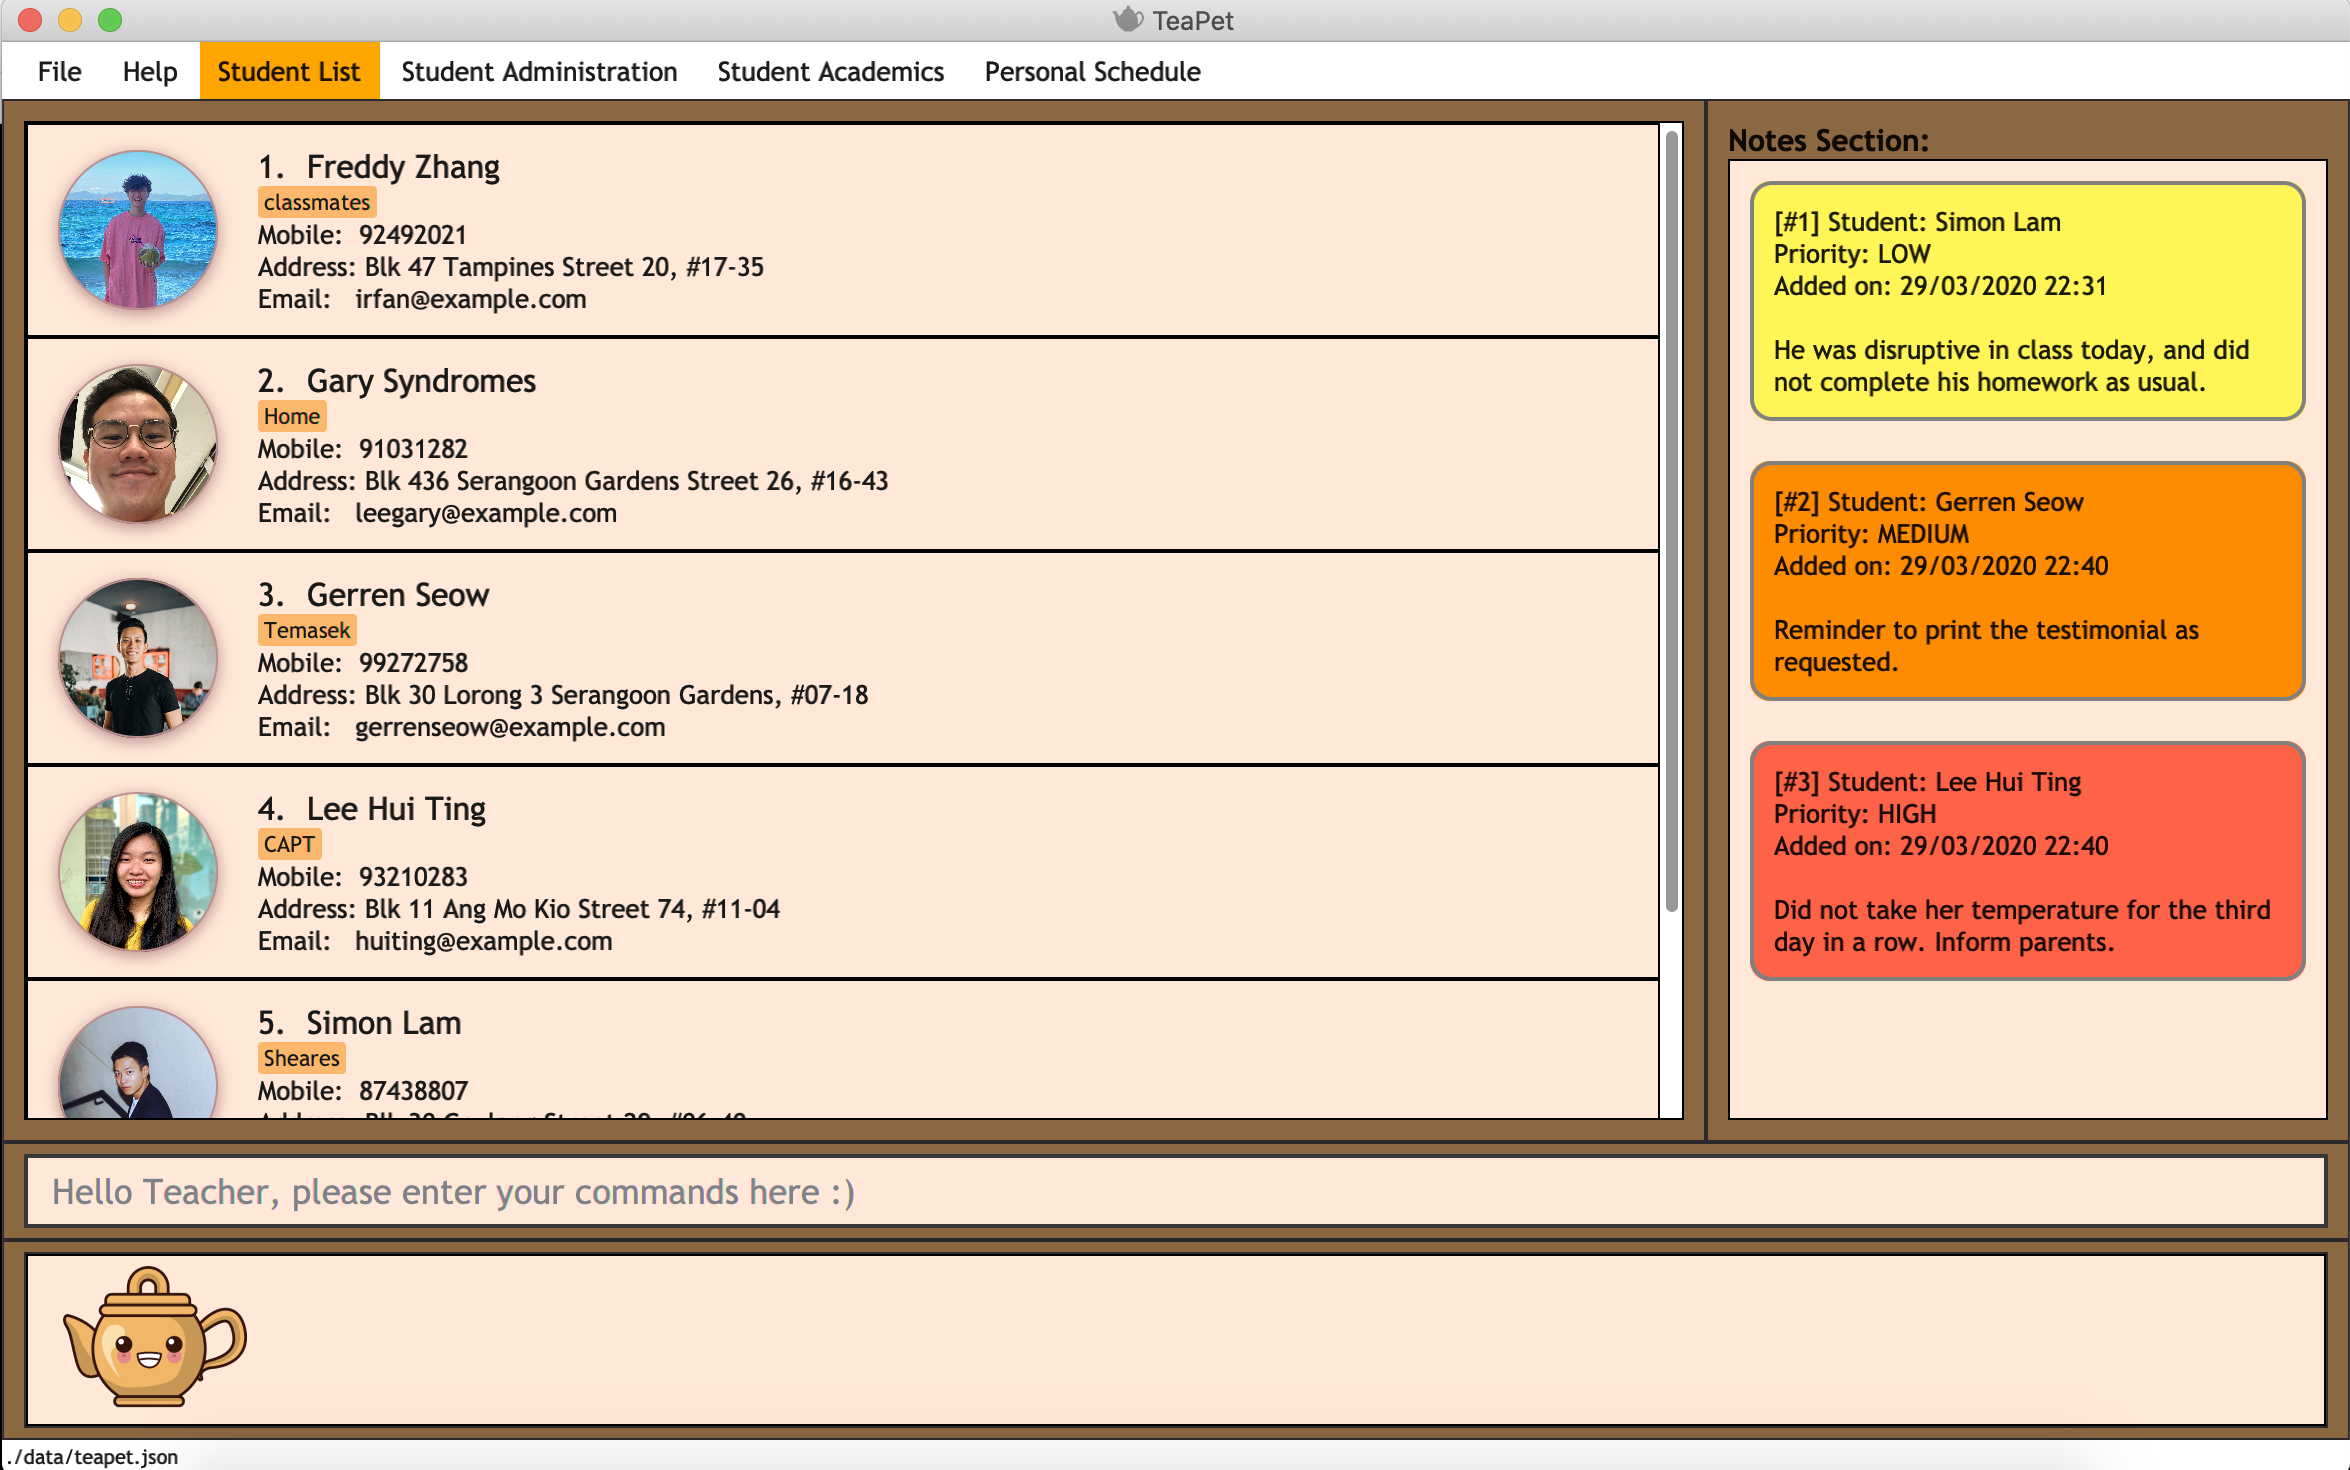 Figure 2. Home View of TeaPet
 -
Type the command in the command box and press Enter to execute it.
For example, typinghelpand pressing Enter will open the help window. -
Some example commands you can try:
-
student add name/Kelvin Klein: adds a contact named Kelvin Klein to the class List -
student delete 3: deletes the 3rd student shown in the current list of students -
exit: exits the app
-
-
Refer to Section 4, “Features” for details of each command.
| If you have any questions, please check out our Section 7, “FAQ [Done by Zhang Yuanyu]” section. |
3. Overview of Features
This section will provide you a brief overview of TeaPet’s cool features and functionality for you to better familiarise yourself with TeaPet.
-
Manage your students easily
-
Include student’s particulars. e.g. address, contact number, next of kin (NOK).
-
Include administrative details of the students. e.g. attendance, temperature.
-
-
Manage your class academic progress easily
-
Include students' grades for homework and examinations.
-
Easy to track progress using helpful tools. e.g. tables, export tools.
-
-
Add Notes to act as lightweight, digital reminders easily
-
Include reminders for yourself to help you remember important information.
-
Search keywords in your notes.
-
Save the notes as administrative or behavioural.
-
-
Plan your schedule easily
-
Create and manage your events with a single calendar.
-
View calendar at a glance.
-
-
Data is saved onto your hard disk automatically
-
Any changes made will be saved onto your computer so you don’t have to worry about data being lost.
-
4. Features
This section aims to provide you with in-depth details of TeaPet’s main features, as well as how to get started with them.
TeaPet General Command Syntax:
Feature + Feature Function + Prefix/Field
Examples of Feature: student, notes, academics
Examples of Feature Function: add, edit, export
Examples of Prefix/Field: name/Kelvin Klein, phone/9000 8000, att/Present
Example of a Valid Command: student add name/Kelvin Klein
Most commands have multiple Prefix/Field combinations to fill.
Prefix/Field combinations with enclosing [] braces refers to it being OPTIONAL.
4.1. Student Particulars [Done by Simon Lam]
TeaPet records down personal particulars of students such as address, contact number and Next of Kin (NOK) particulars. Thereafter, you are able to view, update or delete those information of specific students when deemed necessary.
4.1.1. Display default student view: student
TeaPet syncs the images of students found in the image folder into the student list. More information about updating student images can be found here. TeaPet then displays a summarised list of the student details.
Format: student
Expected Outcome:
The student list now displays DEFAULT details.
[HELP ON STUDENT COMMANDS]
1. Display detailed list: student detailed
2. Add student: student add name/NAME [phone/PHONE] [email/EMAIL] [adr/ADDRESS] [temp/TEMPERATURE] [att/ATTENDANCE] [nok/NAME-RELATIONSHIP-PHONE] [tag/TAG]
3. Edit student: student edit INDEX [name/NAME] [phone/PHONE] [email/EMAIL] [adr/ADDRESS] [temp/TEMPERATURE] [att/ATTENDANCE] [nok/NAME-RELATIONSHIP-PHONE] [tag/TAG]
4. Delete student: student delete INDEX
5. Find student: student find NAME
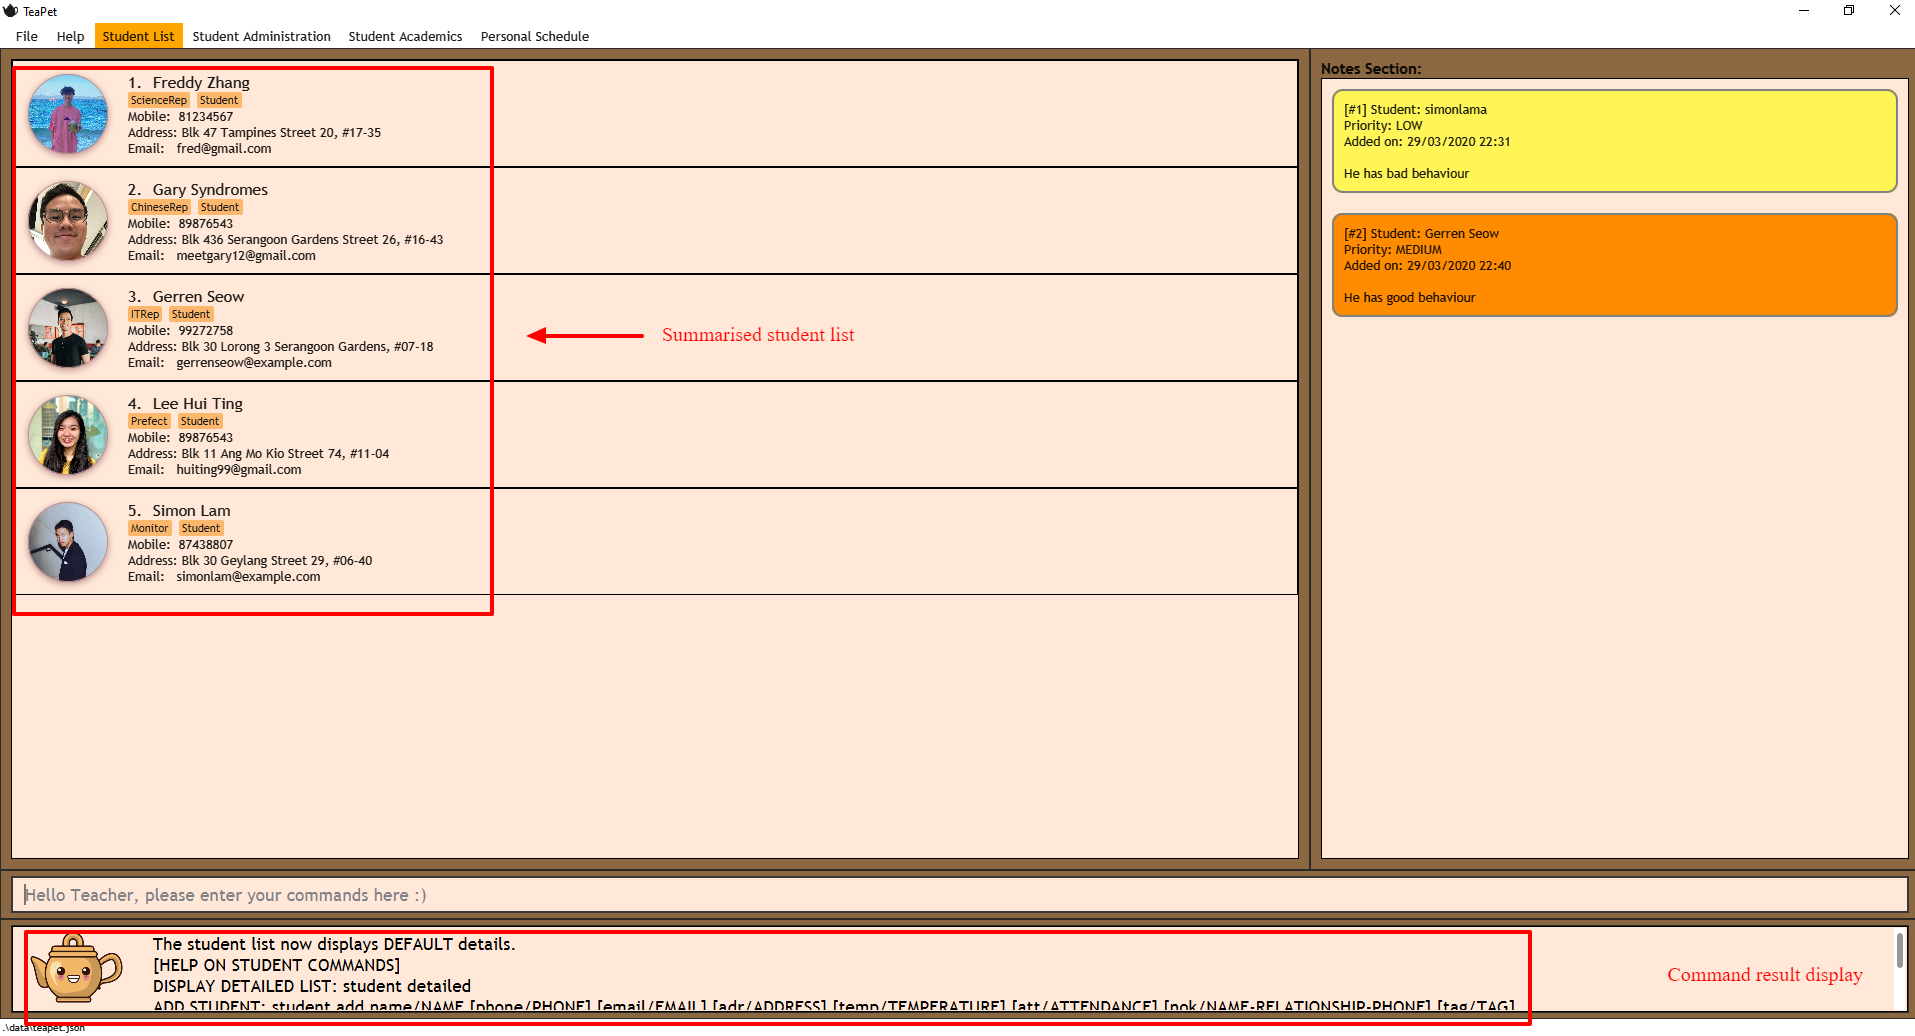
student command4.1.2. Display detailed student view: student detailed
Displays a detailed version of the class list with all information.
Format: student detailed
Expected Outcome:
The student list now displays ALL details.
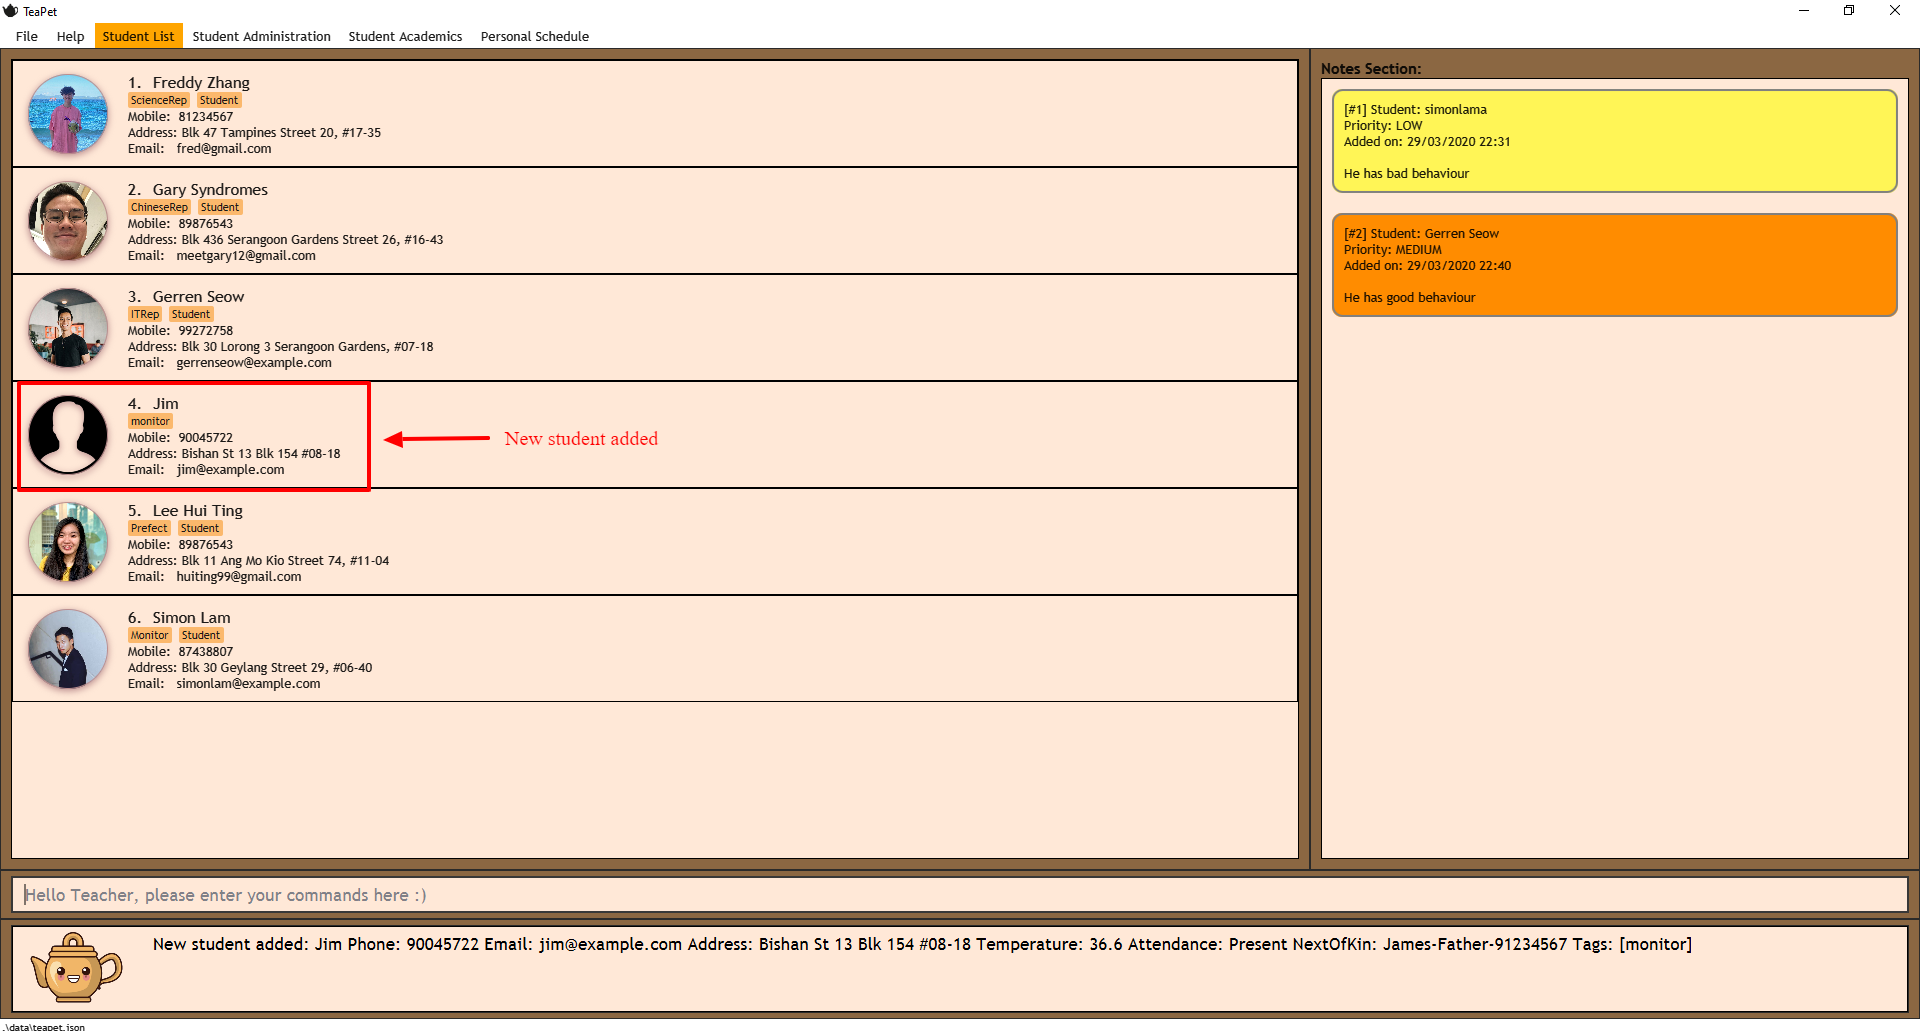
student detailed command4.1.3. Add Student: add
Adds a student into the student list.
Format:
student add name/NAME [phone/PHONE] [email/EMAIL] [adr/ADDRESS] [temp/TEMPERATURE] [att/ATTENDANCE] [nok/NAME-RELATIONSHIP-PHONE] [tag/TAG]
-
Adds a new student with the given attributes.
-
The student name cannot be empty.
| The address of student is not restricted as it can be subjective to the student and teacher. |
| Next-of-kin relationships allowed: Father, Mother, Sister, Brother, Grandfather, Grandmother |
Example:
-
student add name/Jim phone/90045722 email/jim@example.com adr/Bishan St 13 Blk 154 #08-18 tag/monitor nok/James-Father-91234567
   temp/36.6 att/Present
Adds a student named Jim into the student list along with his details.
Expected Outcome:
New student added: Jim Phone: 90045722 Email: jim@example.com Address: Bishan St 13 Blk 154 #08-18 Temperature: 36.6 Attendance: Present NextOfKin: James-Father-91234567 Tags: [monitor]
student add command4.1.4. Edit Student: edit
Edits personal details of students.
Format:
student edit INDEX [name/NAME] [phone/PHONE] [email/EMAIL] [adr/ADDRESS] [temp/TEMPERATURE] [att/ATTENDANCE] [nok/NAME-RELATIONSHIP-PHONE] [tag/TAG]
Example:
-
student edit 1 phone/90023413
Edits the student phone number in index 1 to a new phone number.
Expected Outcome:
Edited Student: Simon Lam Phone: 90023413 Email: simonlam@example.com Address: Blk 30 Geylang Street 29,
#06-40 Temperature: 36.5 Attendance: Sick Remark:  Tags: [Sheares]
4.1.5. Delete Student: delete
Deletes the student and all his personal details from the student list.
Format:
student delete INDEX
Example:
-
student delete 1Deletes the student at index 1.
Expected Outcome:
Deleted Student: Simon Lam Phone: 90023413 Email: simonlam@example.com Address: Blk 30 Geylang Street 29, #06-40 Temperature: 36.5 Attendance: Sick Remark: Tags: [Sheares]
4.1.6. Clear Student List: clear
Clears all data from the student list.
Format:
student clear
Example:
`student clear` Deletes the entire student list
Expected Outcome:
Student list has been cleared!
4.1.7. Find Student: find
Finds the student information from the student list and displays it.
Format:
student find NAME
Example:
-
student find SimonFinds the information a student named Simon.
Expected Outcome:
1 students listed!
4.2. Student Administration [Done by Zhang Yuanyu]
TeaPet’s Class Administration feature is used to keep track of administrative details such as daily attendance and temperature recordings.
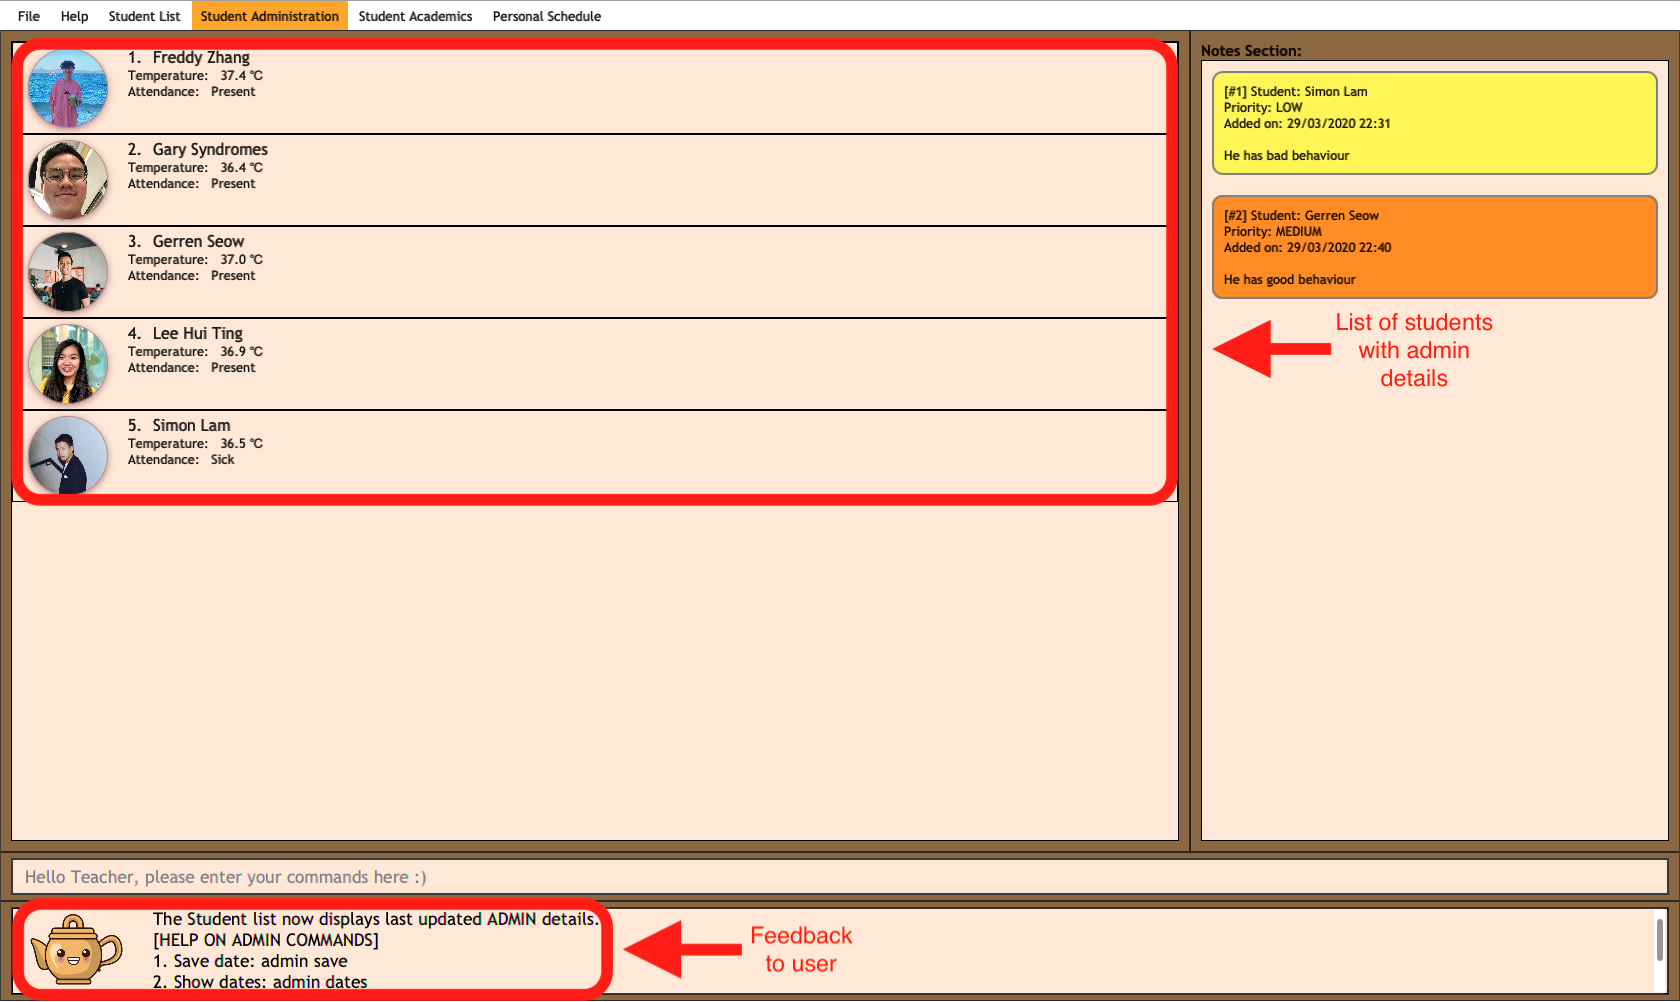
4.2.1. Displaying of the class’s last updated administrative information: admin
Shows the last updated administrative information in the student list.
Format:
admin
Expected Outcome:
The Student list now displays last updated ADMIN details.
[HELP ON ADMIN COMMANDS]
1. Save date: admin save
2. Show dates: admin dates
3. Delete date: admin delete YYYY-MM-DD
4. Fetch date: admin fetch YYYY-MM-DD
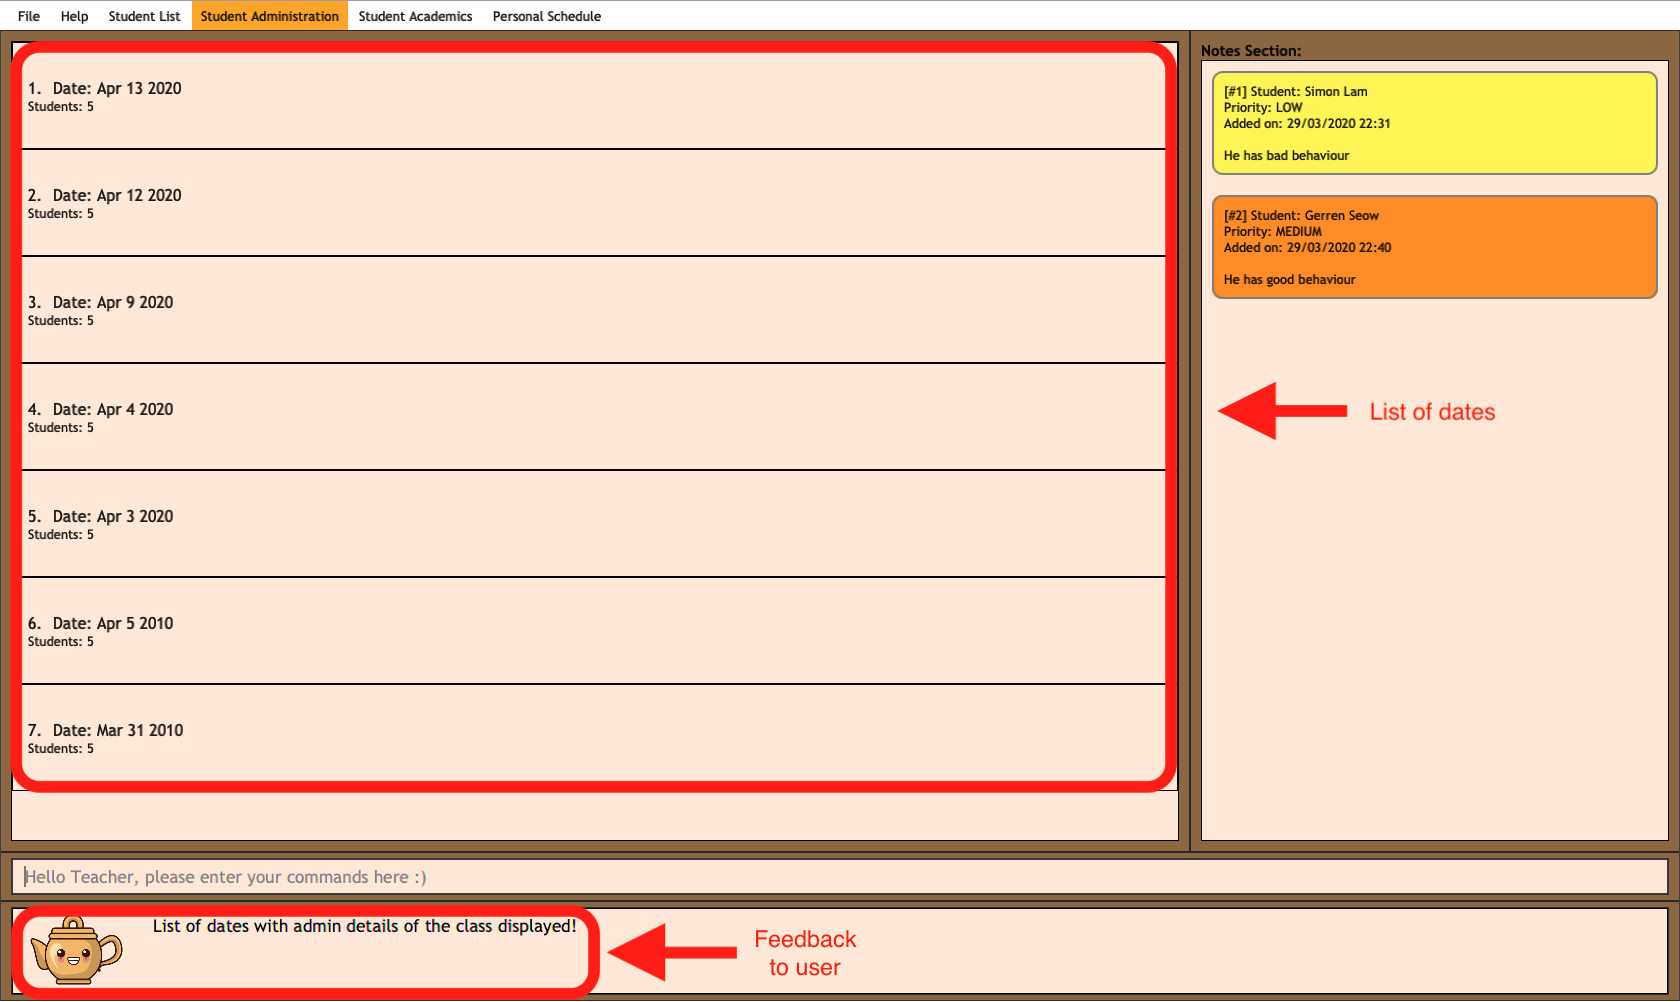
admin command4.2.2. Displaying of the dates with administrative information of the class: admin dates
Shows a list of dates that contains administrative information of the class.
Format:
admin dates
Expected Outcome:
List of dates with admin details of the class displayed!
admin dates command4.2.3. Fetching of administrative information of the class at the specified date: admin fetch
Retrieves the administrative information of the class at the date provided.
Format:
admin fetch DATE
| Date should be written in YYYY-MM-DD format. If date provided is not in data base, an error message will be shown. |
Example:
-
admin fetch 2020-04-02
Retrieves the administrative information of the class at on April 2 2020.
Expected Outcome:
Class admin details for Apr 2 2020 listed!
4.2.4. Saves today’s administrative information of the class: admin save
Saves today’s administrative information of the class.
Format:
admin save
-
Takes a screenshot of the most updated class administrative details and saves it as today’s date.
-
If the class administrative information has been saved before earlier on the same day, saving it again will result duplicates, resulting in an error and an error message.
-
If there are changes to the class administrative information today and you wish to save it again, you would have to delete today’s date from the list of dates and save it again.
-
Old dates and their administrative details cannot be edited to prevent mutation of data.
Example:
-
admin save: Saves the administrative information of the class with today’s date, taking April 8 2020 as an example.
Expected Outcome:
This admin list has been saved for Apr 8 2020
4.2.5. Deleting of administrative information of the class at the specified date: admin delete
Deletes the administrative information of the class at the specified date.
Format:
admin delete DATE
| Date should be written in YYYY-MM-DD format. If date provided is not in data base, an error message will be shown. |
Example:
-
admin delete 2020-04-08: Deletes the administrative information of the class at on April 8 2020.
Expected Outcome:
Admin list has been deleted for Apr 8 2020
4.3. Student Academics [Done by Lee Hui Ting]
TeaPet’s Class Progress Tracker is able to keep tabs on the class' academic progress. You will be able to store data of every student’s subject grades with this feature. Thereafter, there will be a csv file available for export displaying the progress of individual students as well as the entire class.
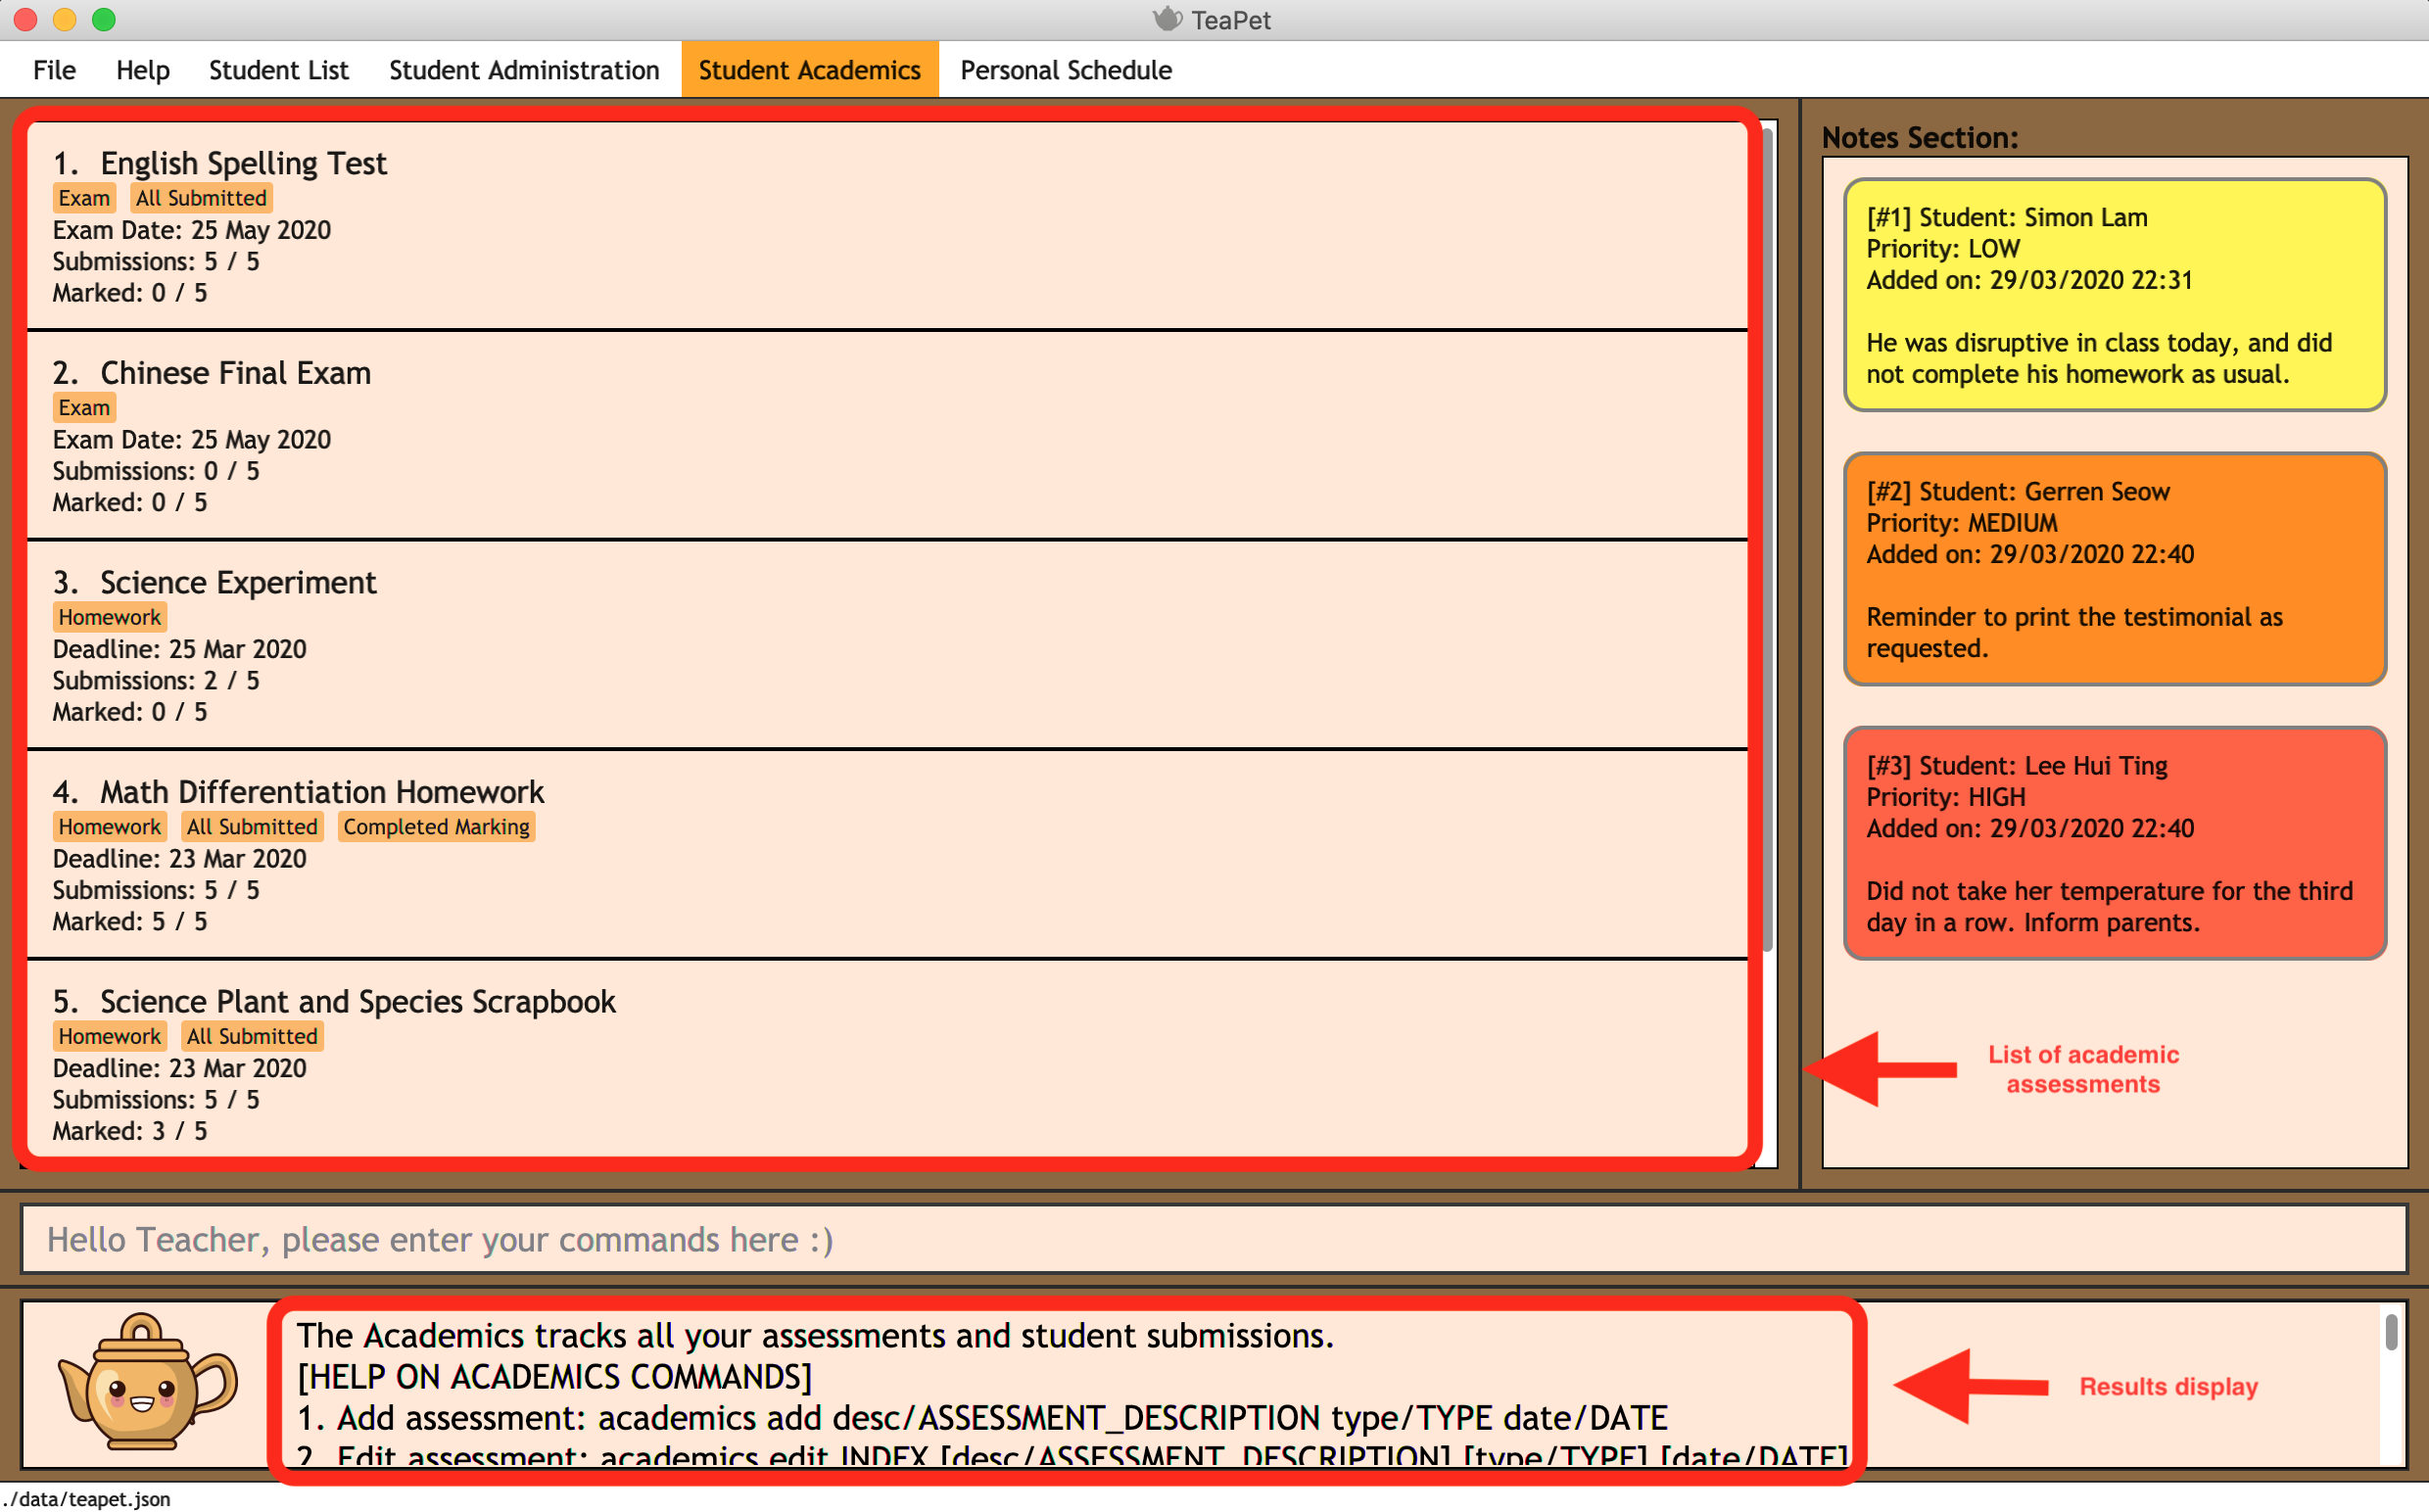
4.3.1. Display all Assessments and Academics Help: academics
Shows all assessments in the academics list and a guide for academic commands.
Format:
academics
Expected Outcome:
The Academics tracks all your assessments and student submissions.
[HELP ON ACADEMICS COMMANDS]
1. Add assessment: academics add desc/ASSESSMENT_DESCRIPTION type/TYPE date/DATE
2. Edit assessment: academics edit INDEX [desc/ASSESSMENT_DESCRIPTION] [type/TYPE] [date/DATE]
3. Delete assessment: academics delete INDEX
4. Submit assessment: academics submit INDEX [stu/STUDENT_NAME]...
5. Mark assessment: academics mark INDEX [stu/STUDENT_NAME-SCORE]...
6. Filter assessment BY TYPE: academics ASSESSMENT_TYPE (only homework or exam)
7. View academics report: academics report
8. Export academics report: academics export
Type the following commands for more info!
academics command4.3.2. Add Assessment: academics add
Adds an assessment into the academics list.
Format:
academics add desc/ASSESSMENT_DESCRIPTION type/TYPE date/DATE
Adds a new assessment with the given attributes.
| The assessment description cannot be empty. Date should be written in YYYY-MM-DD format. |
Example:
-
academics add desc/Math Graphs Homework type/homework date/2020-05-02
Adds an assessment "Math Graphs Homework" into the academics list along with its deadline.
Expected Outcome:
Added assessment:
Homework: Math Graphs Homework
Due by: 2020-05-02
4.3.3. Edit Assessment: academics edit
Edits an assessment from the academics list.
Format:
academics edit INDEX [desc/ASSESSMENT_DESCRIPTION] [type/TYPE] [date/DATE]
Edits the assessment with the given attributes.
| The assessment description cannot be empty. Date should be written in YYYY-MM-DD format. |
Example:
-
academics edit 4 desc/Chemistry Compounds Assignment
Edits assessment in the academics list with the new description "Chemistry Compounds Assignment".
Expected Outcome:
Edited Assessment:
Homework: Chemistry Compounds Assignment
Due by: 2020-04-30
4.3.4. Delete Assessment: academics delete
Deletes an assessment from the academics list.
Format:
academics delete INDEX
-
Deletes the assessment with at the given index.
Index should be a positive integer and be a valid index.
Example:
-
academics delete 5Deletes the student at index 5.
Expected Outcome:
Deleted Assessment:
Homework: Chemistry Compounds Assignment
Due by: 2020-04-30
4.3.5. Submit Assessment: academics submit
Submits student(s) work for a specific assessment.
Format:
academics submit INDEX [stu/STUDENT_NAME]...
Submits work for the assessment with at the given index.
| Index should be a positive integer and be a valid index. |
| Student whose work has already been submitted cannot be submitted again. |
Example:
-
academics submit 3 stu/Freddy Zhang
Submits "Freddy Zhang" for the assessment at index 3. -
academics submit 3 stu/Freddy Zhang stu/Gerren Seow
Submits "Freddy Zhang" and "Gerren Seow" for the assessment at index 3.
Expected Outcome:
Academics submitted following submissions:
Freddy Zhang
Gerren Seow
4.3.6. Mark Assessment: academics mark
Marks student(s) work for a specific assessment.
Format:
academics mark INDEX [stu/STUDENT_NAME-SCORE]...
Marks work for the assessment with at the given index.
| Index should be a positive integer and be a valid index. |
| Only the submissions of students whose work has already been submitted can be marked. |
Example:
-
academics mark 3 stu/Freddy Zhang
Marks "Freddy Zhang" for the assessment at index 3. -
academics mark 3 stu/Freddy Zhang-90 stu/Gerren Seow-80
Marks "Freddy Zhang" and "Gerren Seow" for the assessment at index 3.
Expected Outcome:
Academics marked following submissions:
Gerren Seow: 80
Freddy Zhang: 90
4.3.7. Filter Assessments by type: academics homework/exam
Filters assessment list by either homework or exam.
Format:
academics ASSESSMENT_TYPE
Example:
-
academics homework
Expected Outcome:
Academics now displays all HOMEWORK assessments
Example:
-
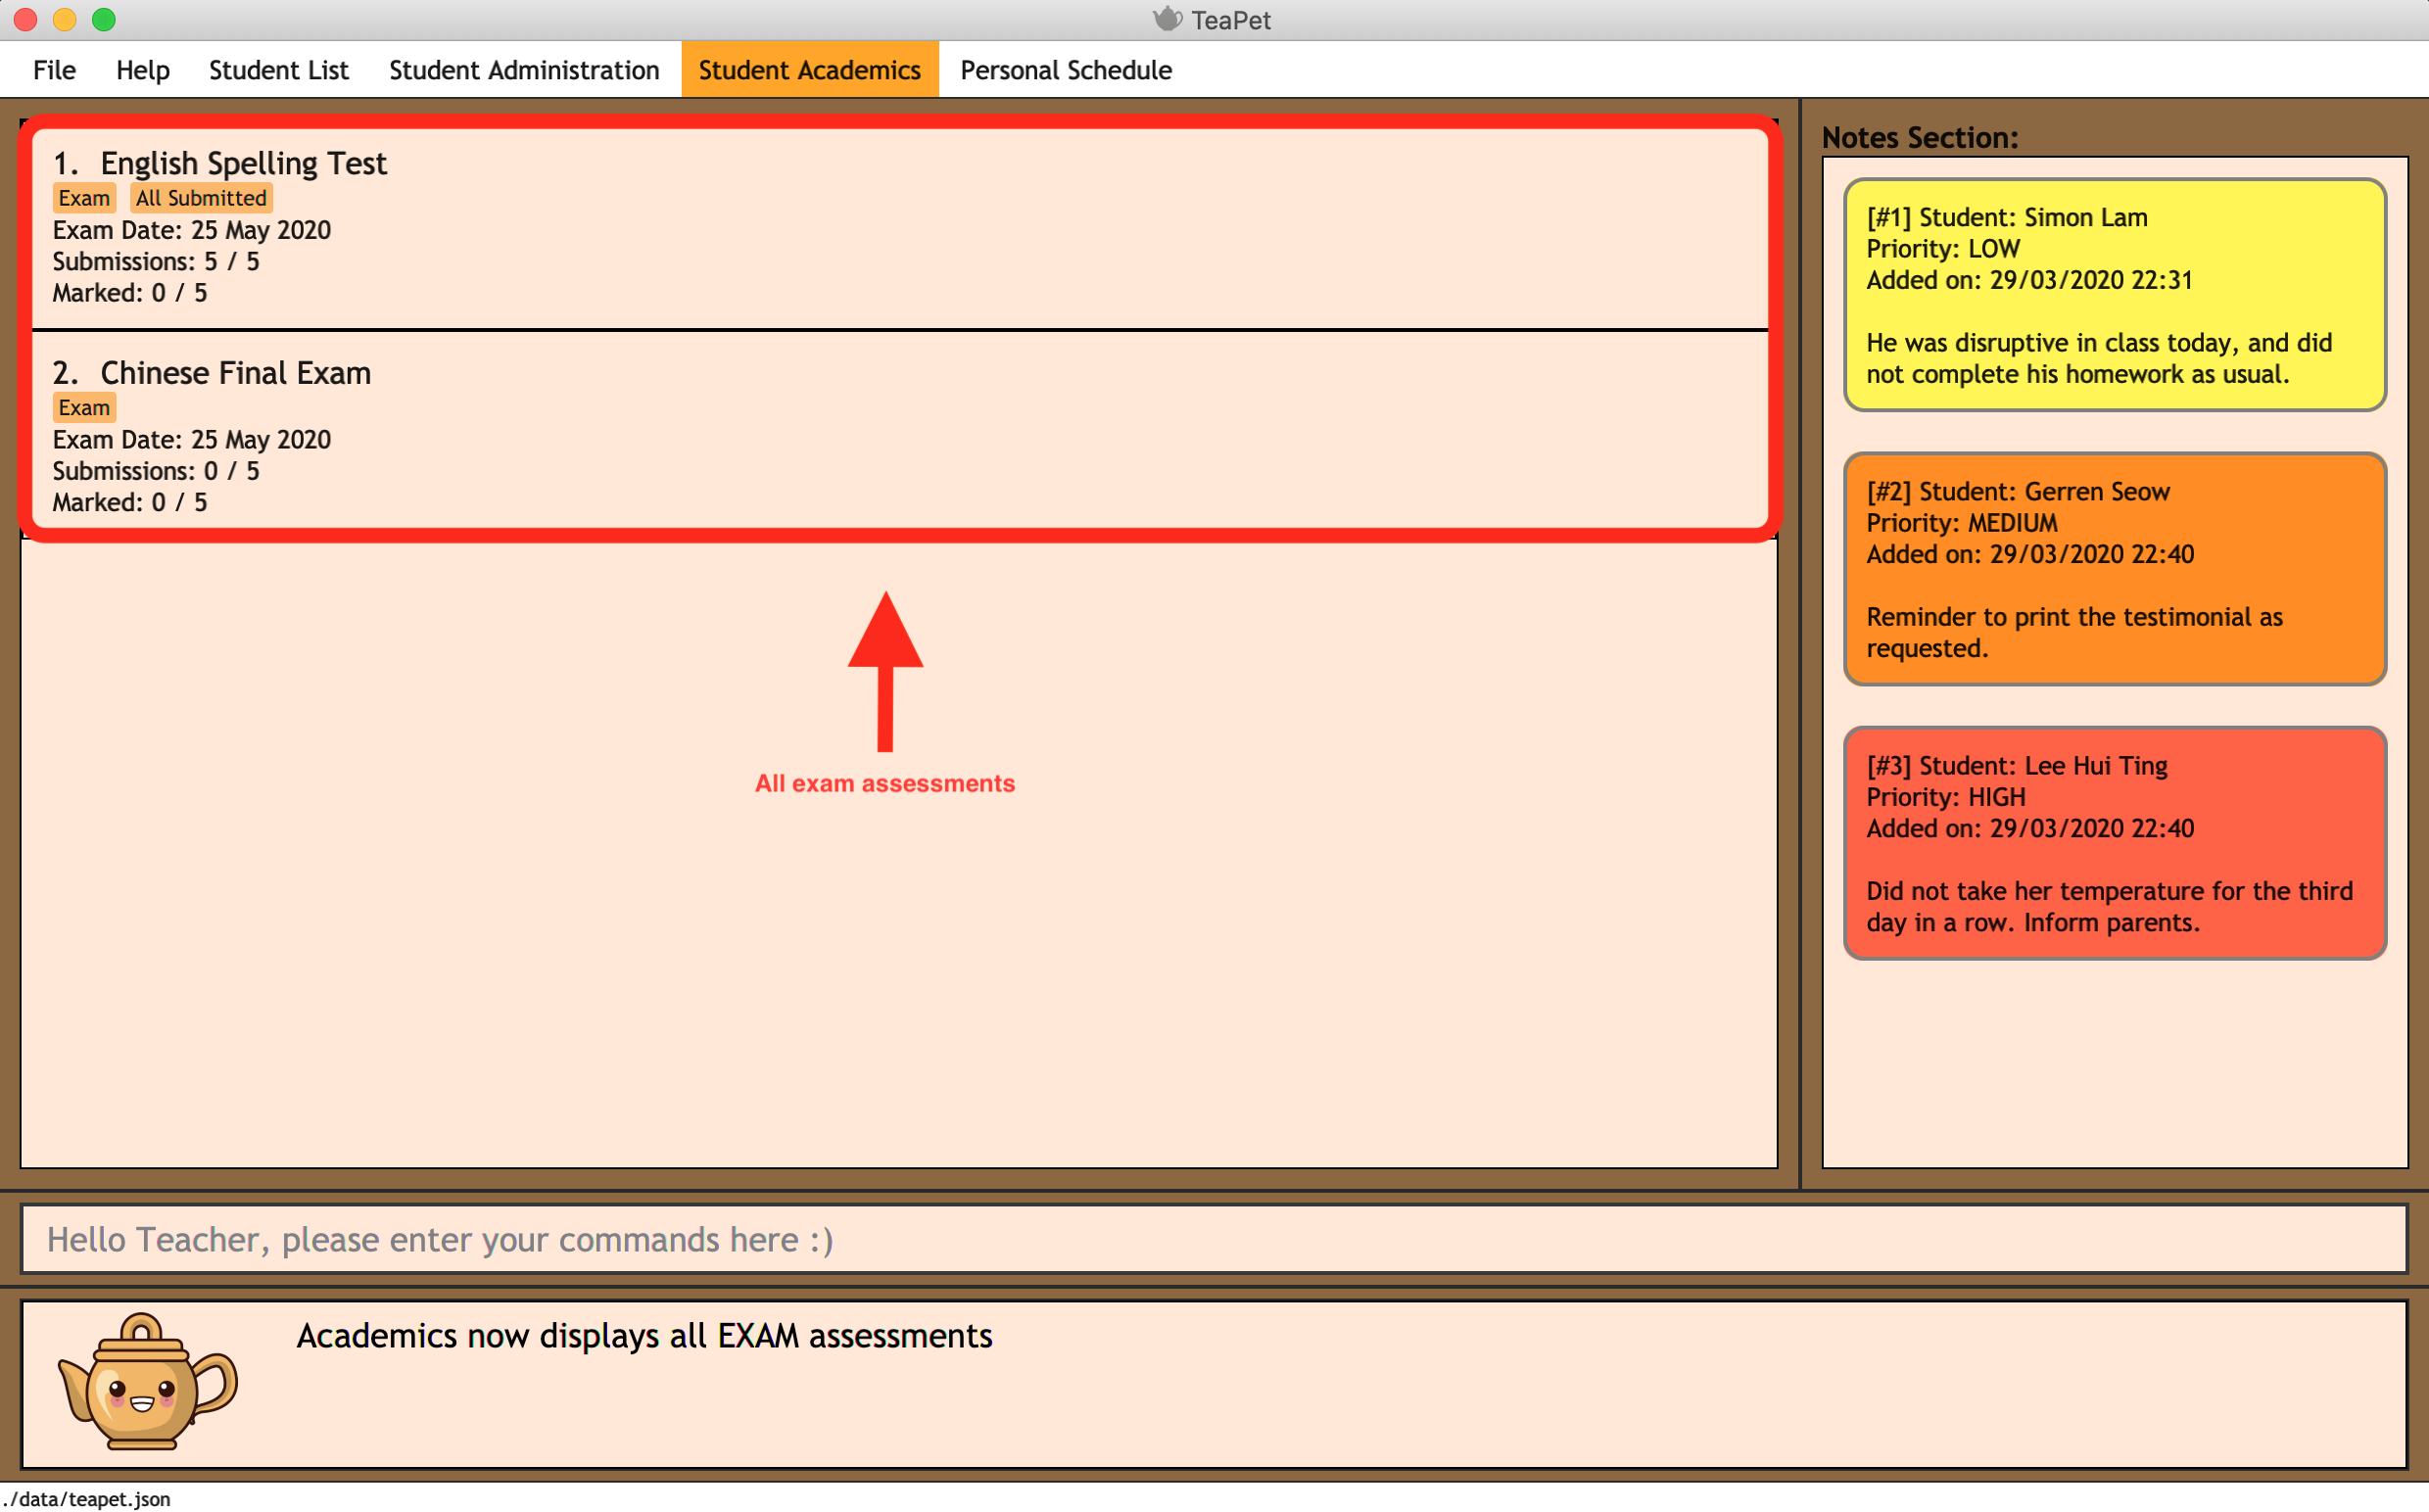
academics exam
Expected Outcome:
Academics now displays all EXAM assessments
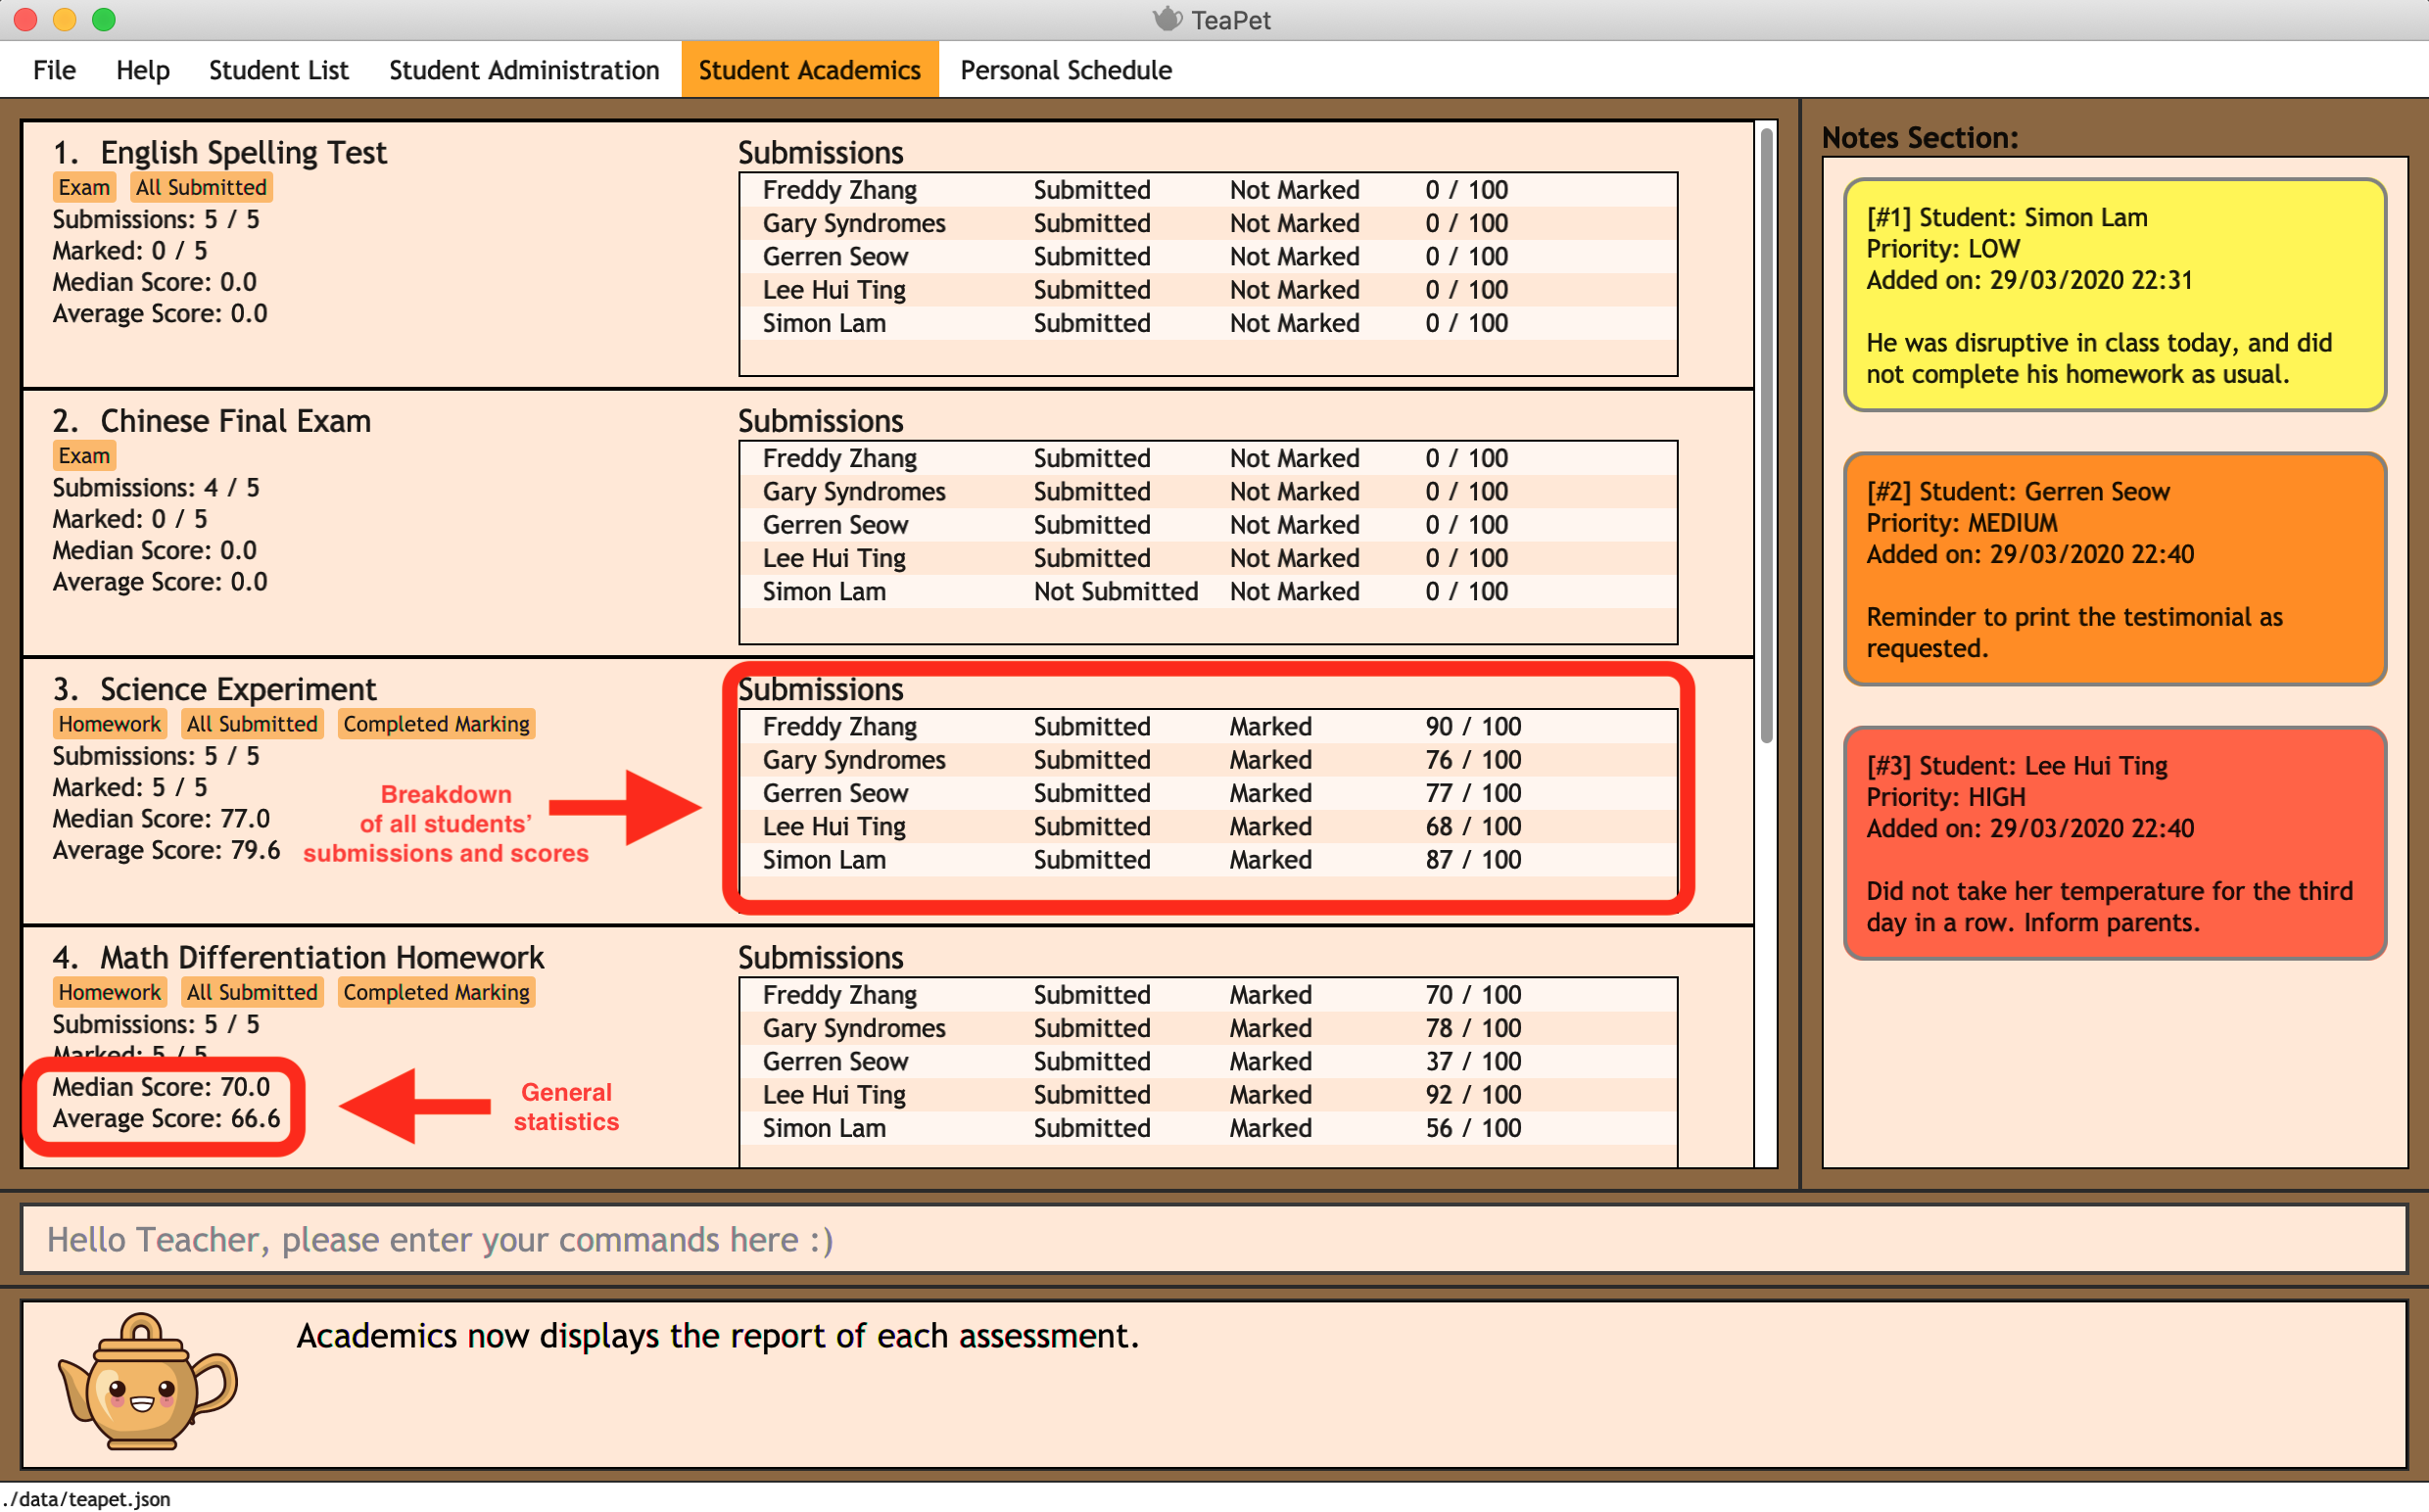
academics exam command4.3.8. View Academics Report: academics report
Generates an academic report for each assessment.
Format:
academics report
Expected Outcome:
Academics now displays the report of each assessment.
academics report command4.3.9. Export Academics Report: academics export
Exports the academic report into a csv file.
Format:
academics export
-
Academics report will be exported to a .csv file format, which is located in the data folder in the same directory. The file is named "studentAcademics.csv".
Expected Outcome:
Academics are exported to studentAcademics.csv in the data folder.
4.4. Notes [Done by Gerren Seow]
TeaPet’s Notes feature performs like the ones we all use in our everyday lives, aiming to help form teachers keep track of important information of their students spontaneously. This feature allows you to label each note with different priority to better manage tasks. Every note is specifically tagged to a student, such you will be able to better keep track of the stakeholder and information.
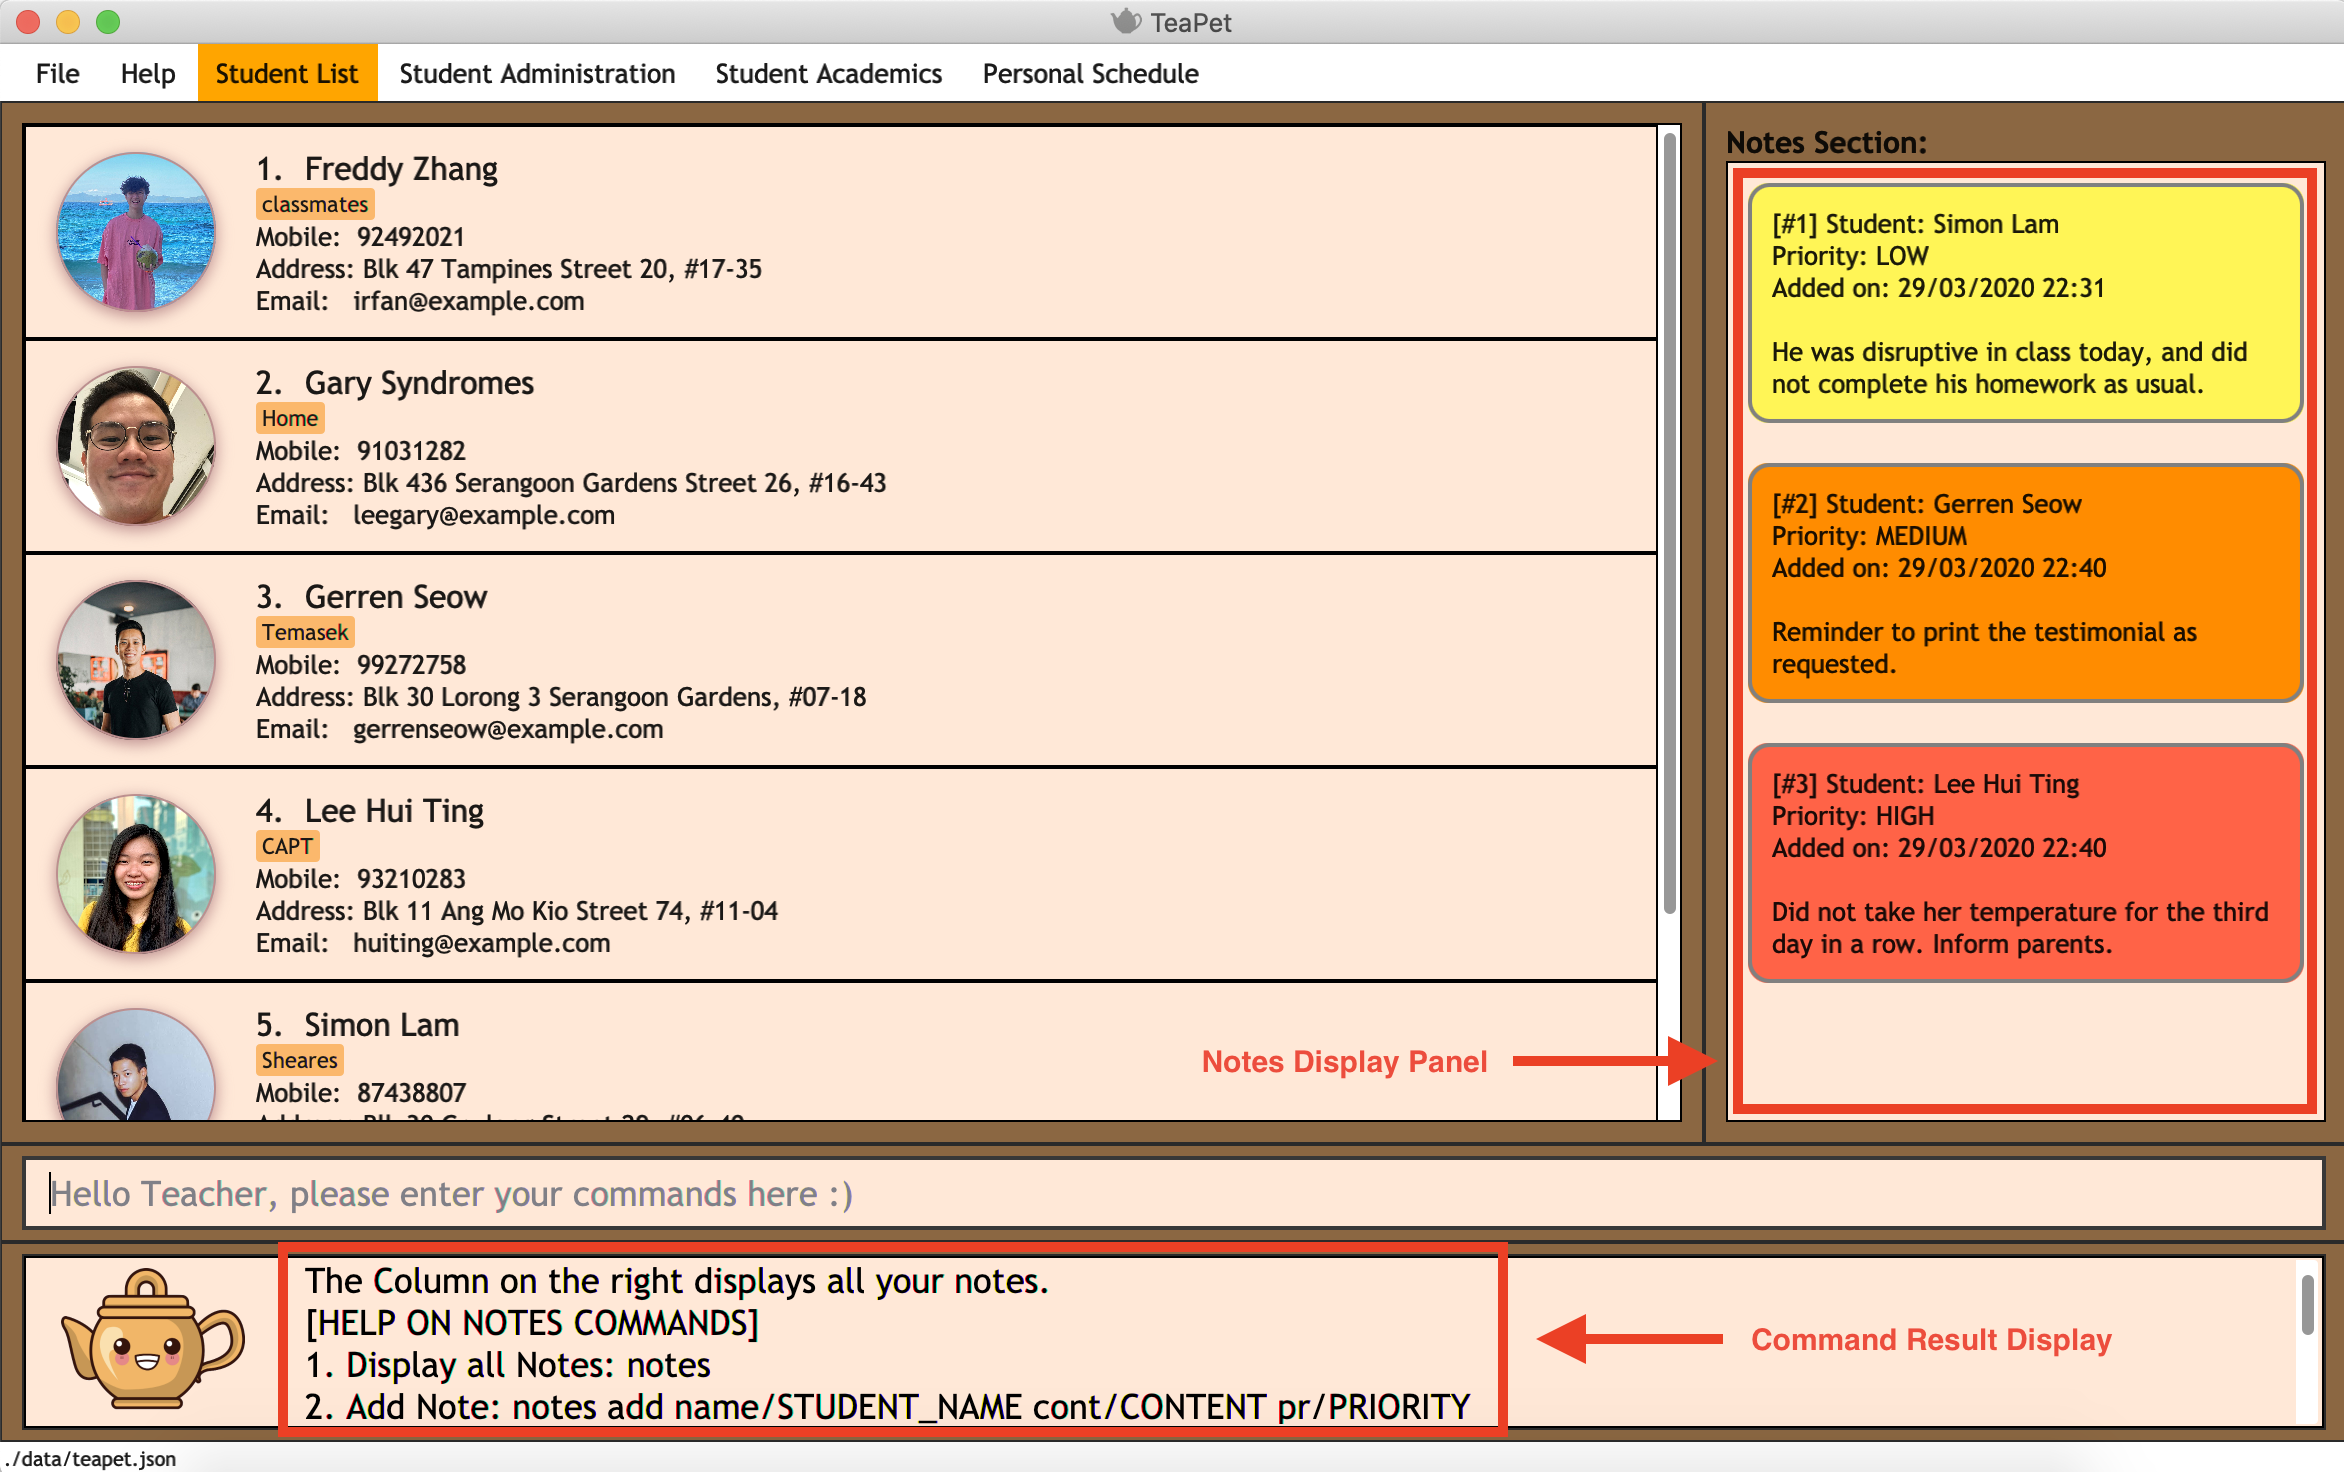
4.4.1. Display all Notes and Help notes
Shows all notes currently stored in TeaPet, and displays help on the usage of this feature.
Format:
notes
Expected Outcome:
The Column on the right displays all your notes.
[HELP ON NOTES COMMANDS]
1. Display all Notes: notes
2. Add Note: notes add name/STUDENT_NAME cont/CONTENT pr/PRIORITY
3. Edit Note: notes edit INDEX [name/UPDATED_STUDENT_NAME] [cont/UPDATED_CONTENT] [pr/UPDATED_PRIORITY]
4. Delete Note: notes delete INDEX
5. Filter Search Notes: notes filter KEYWORD(S)
6. Export Notes: notes export
notes command4.4.2. Add Notes notes add
Adds a note into TeaPet.
Format:
notes add name/STUDENT_NAME cont/CONTENT pr/PRIORITY
-
Create and add a new note with the following fields.
-
An automatic timestamp is generated for each note added.
| None of the fields can be empty. Priority must either be LOW, MEDIUM or HIGH. |
| Student’s name (case-sensitive) indicated in the name field must be already present in the class-list. Please refer to Section 4.1.3, "Add Student" should you need help on adding a student. |
Example:
-
notes add name/Freddy Zhang cont/Reminder to inform his parents about Freddy’s exemplary behaviour. pr/LOW
Adds a note for student "Freddy Zhang" into the list of notes, together with content and priority.
Expected Outcome:
New Student Note added! Wonderful!
[NOTE]
Student: Freddy Zhang
Content: Reminder to inform his parents about Freddy’s exemplary behaviour.
Priority: LOW

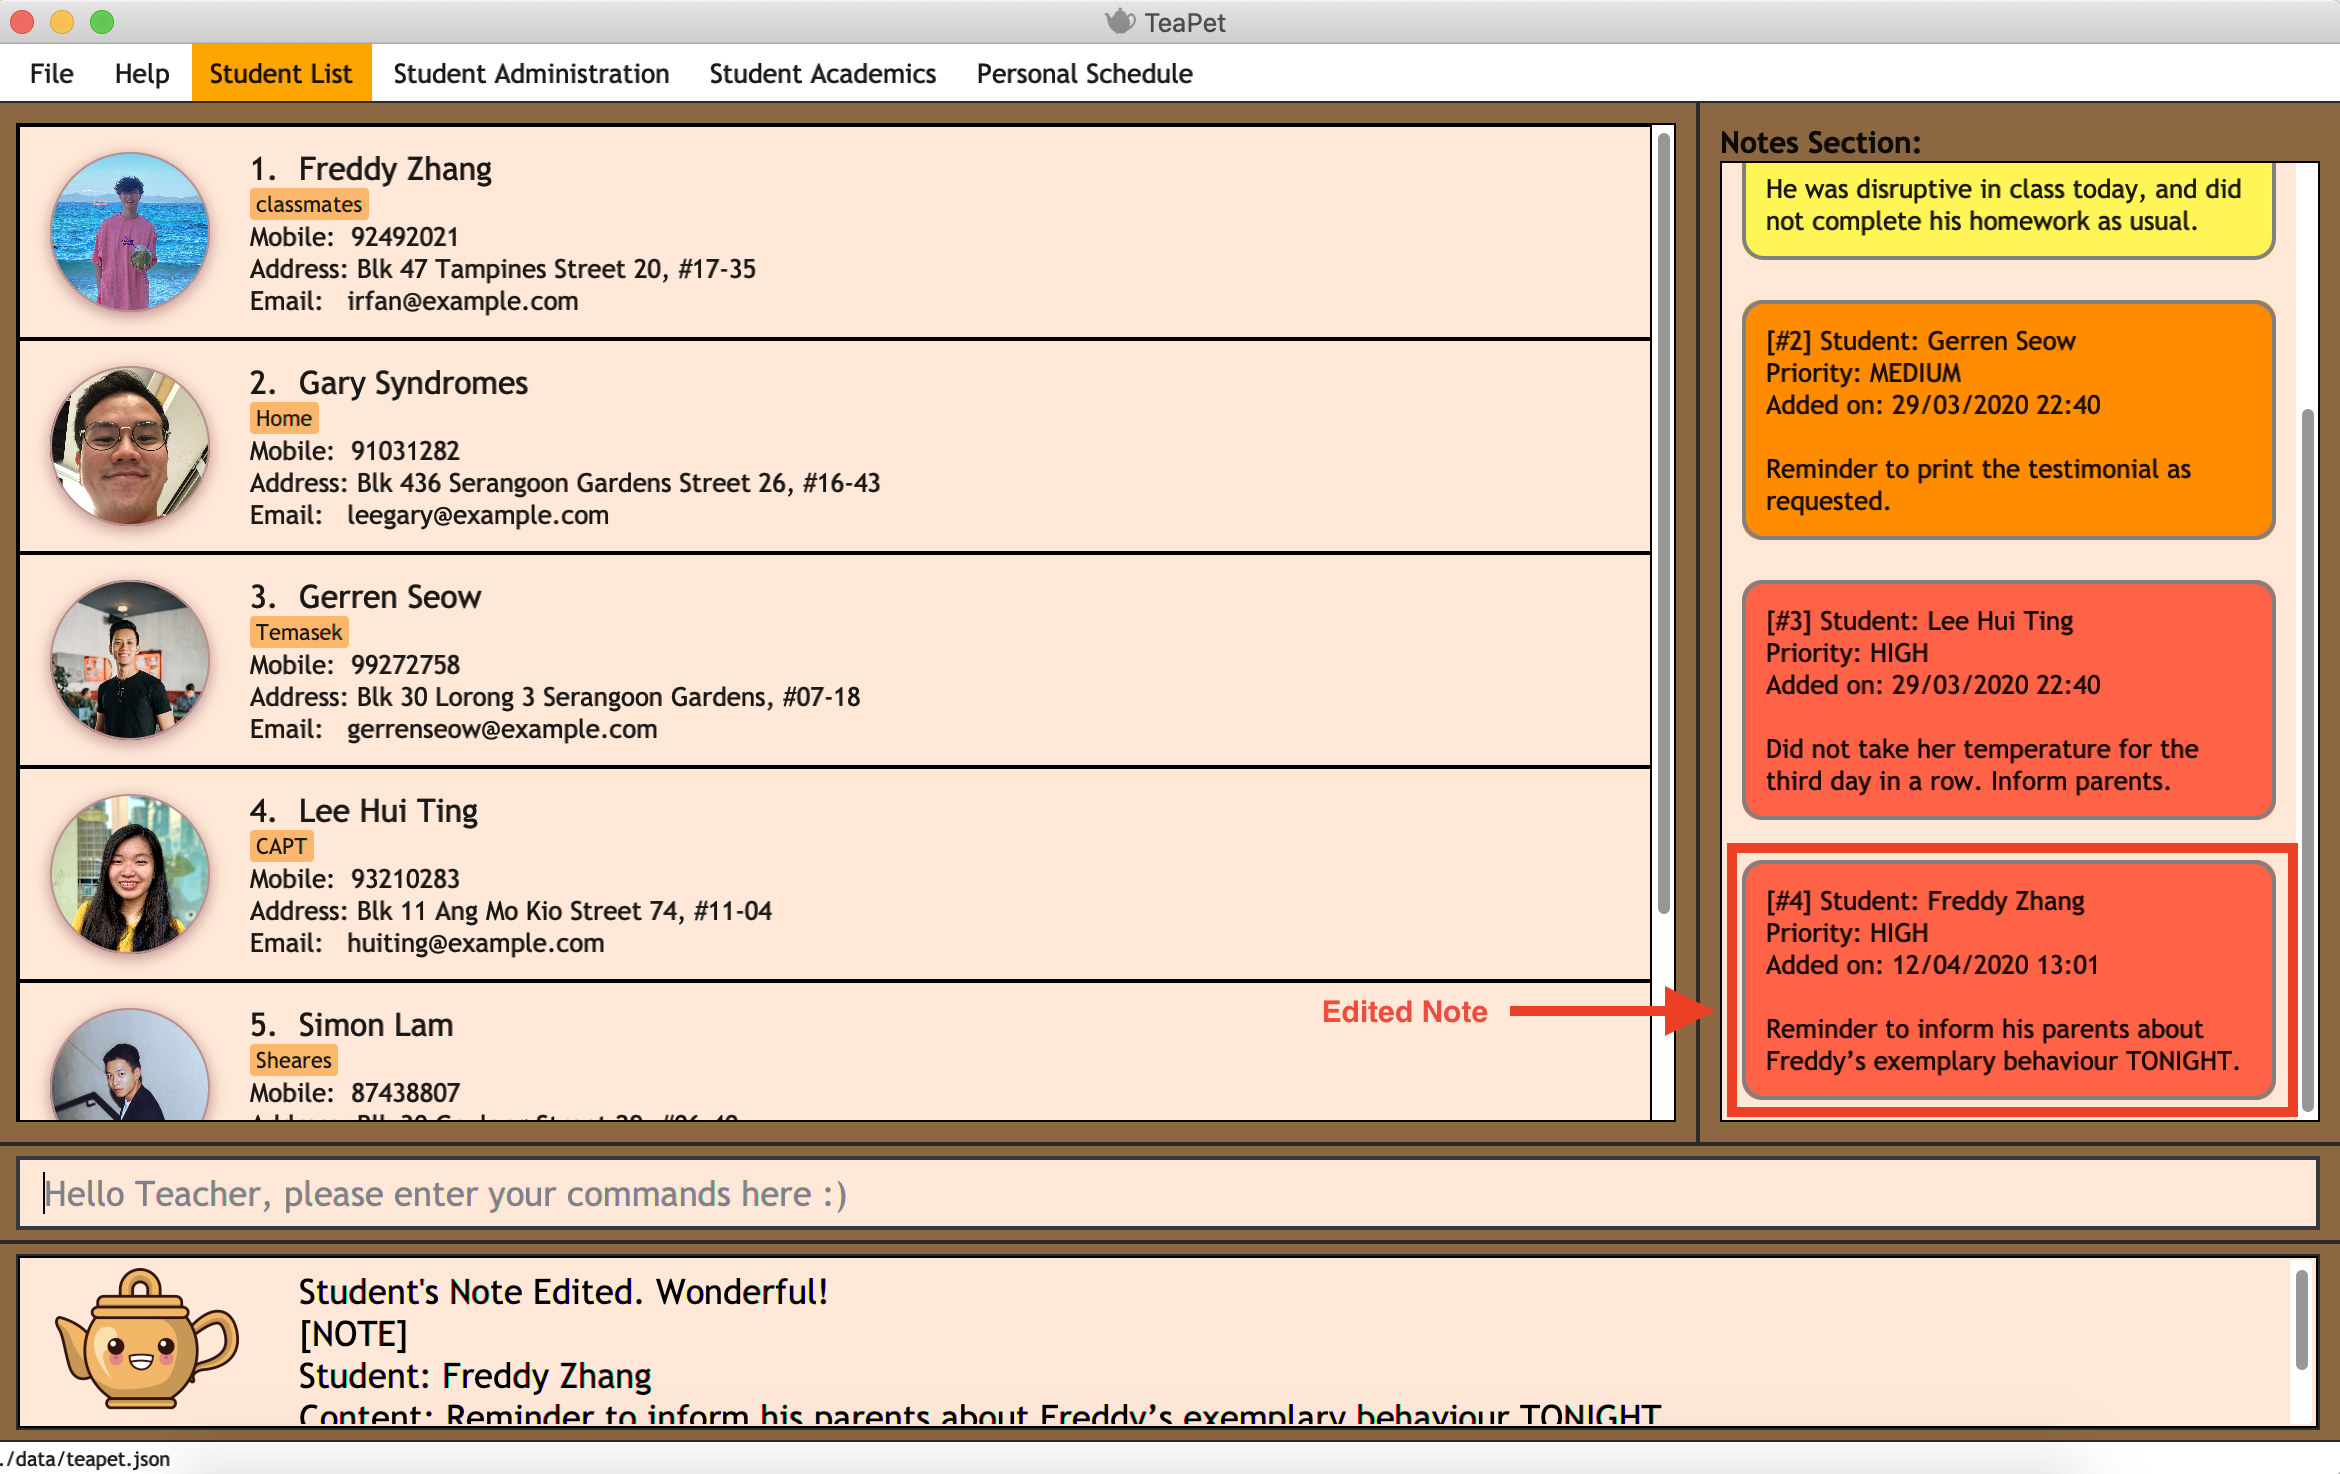
notes add command4.4.3. Edit Notes notes edit
Edits a note in TeaPet.
Format:
notes edit INDEX [name/UPDATED_STUDENT_NAME] [cont/UPDATED_CONTENT] [pr/UPDATED_PRIORITY]
-
Edits a current note in the list by index. Index chosen must be an integer within the total number of notes.
| At least 1 of the three prefix fields must be indicated. Priority must either be LOW, MEDIUM or HIGH. |
| Updated student’s name (case-sensitive) indicated in the name field must be already present in the class-list. Please refer to Section 4.1.3, "Add Student" should you need help on adding a student. |
Example:
-
notes edit 4 cont/Reminder to inform his parents about Freddy’s exemplary behaviour TONIGHT. pr/HIGH
Edits a note for student "Freddy Zhang" in the list of notes, together with updated content and updated priority.
Expected Outcome:
Student's Note Edited. Wonderful!
[NOTE]
Student: Freddy Zhang
Content: Reminder to inform his parents about Freddy’s exemplary behaviour TONIGHT.
Priority: HIGH
notes edit command4.4.4. Delete Notes notes delete
Deletes a note in TeaPet.
Format:
notes delete INDEX
-
Deletes a current note in the list by index. Index must be an integer within the total number of notes.
Example:
-
notes delete 4
Deletes the 4th note in the list. In this example, the note is the one we created for student "Freddy Zhang".
Expected Outcome:
Student Note deleted.
[NOTE]
Student: Freddy Zhang
Content: Reminder to inform his parents about Freddy’s exemplary behaviour TONIGHT.
Priority: HIGH
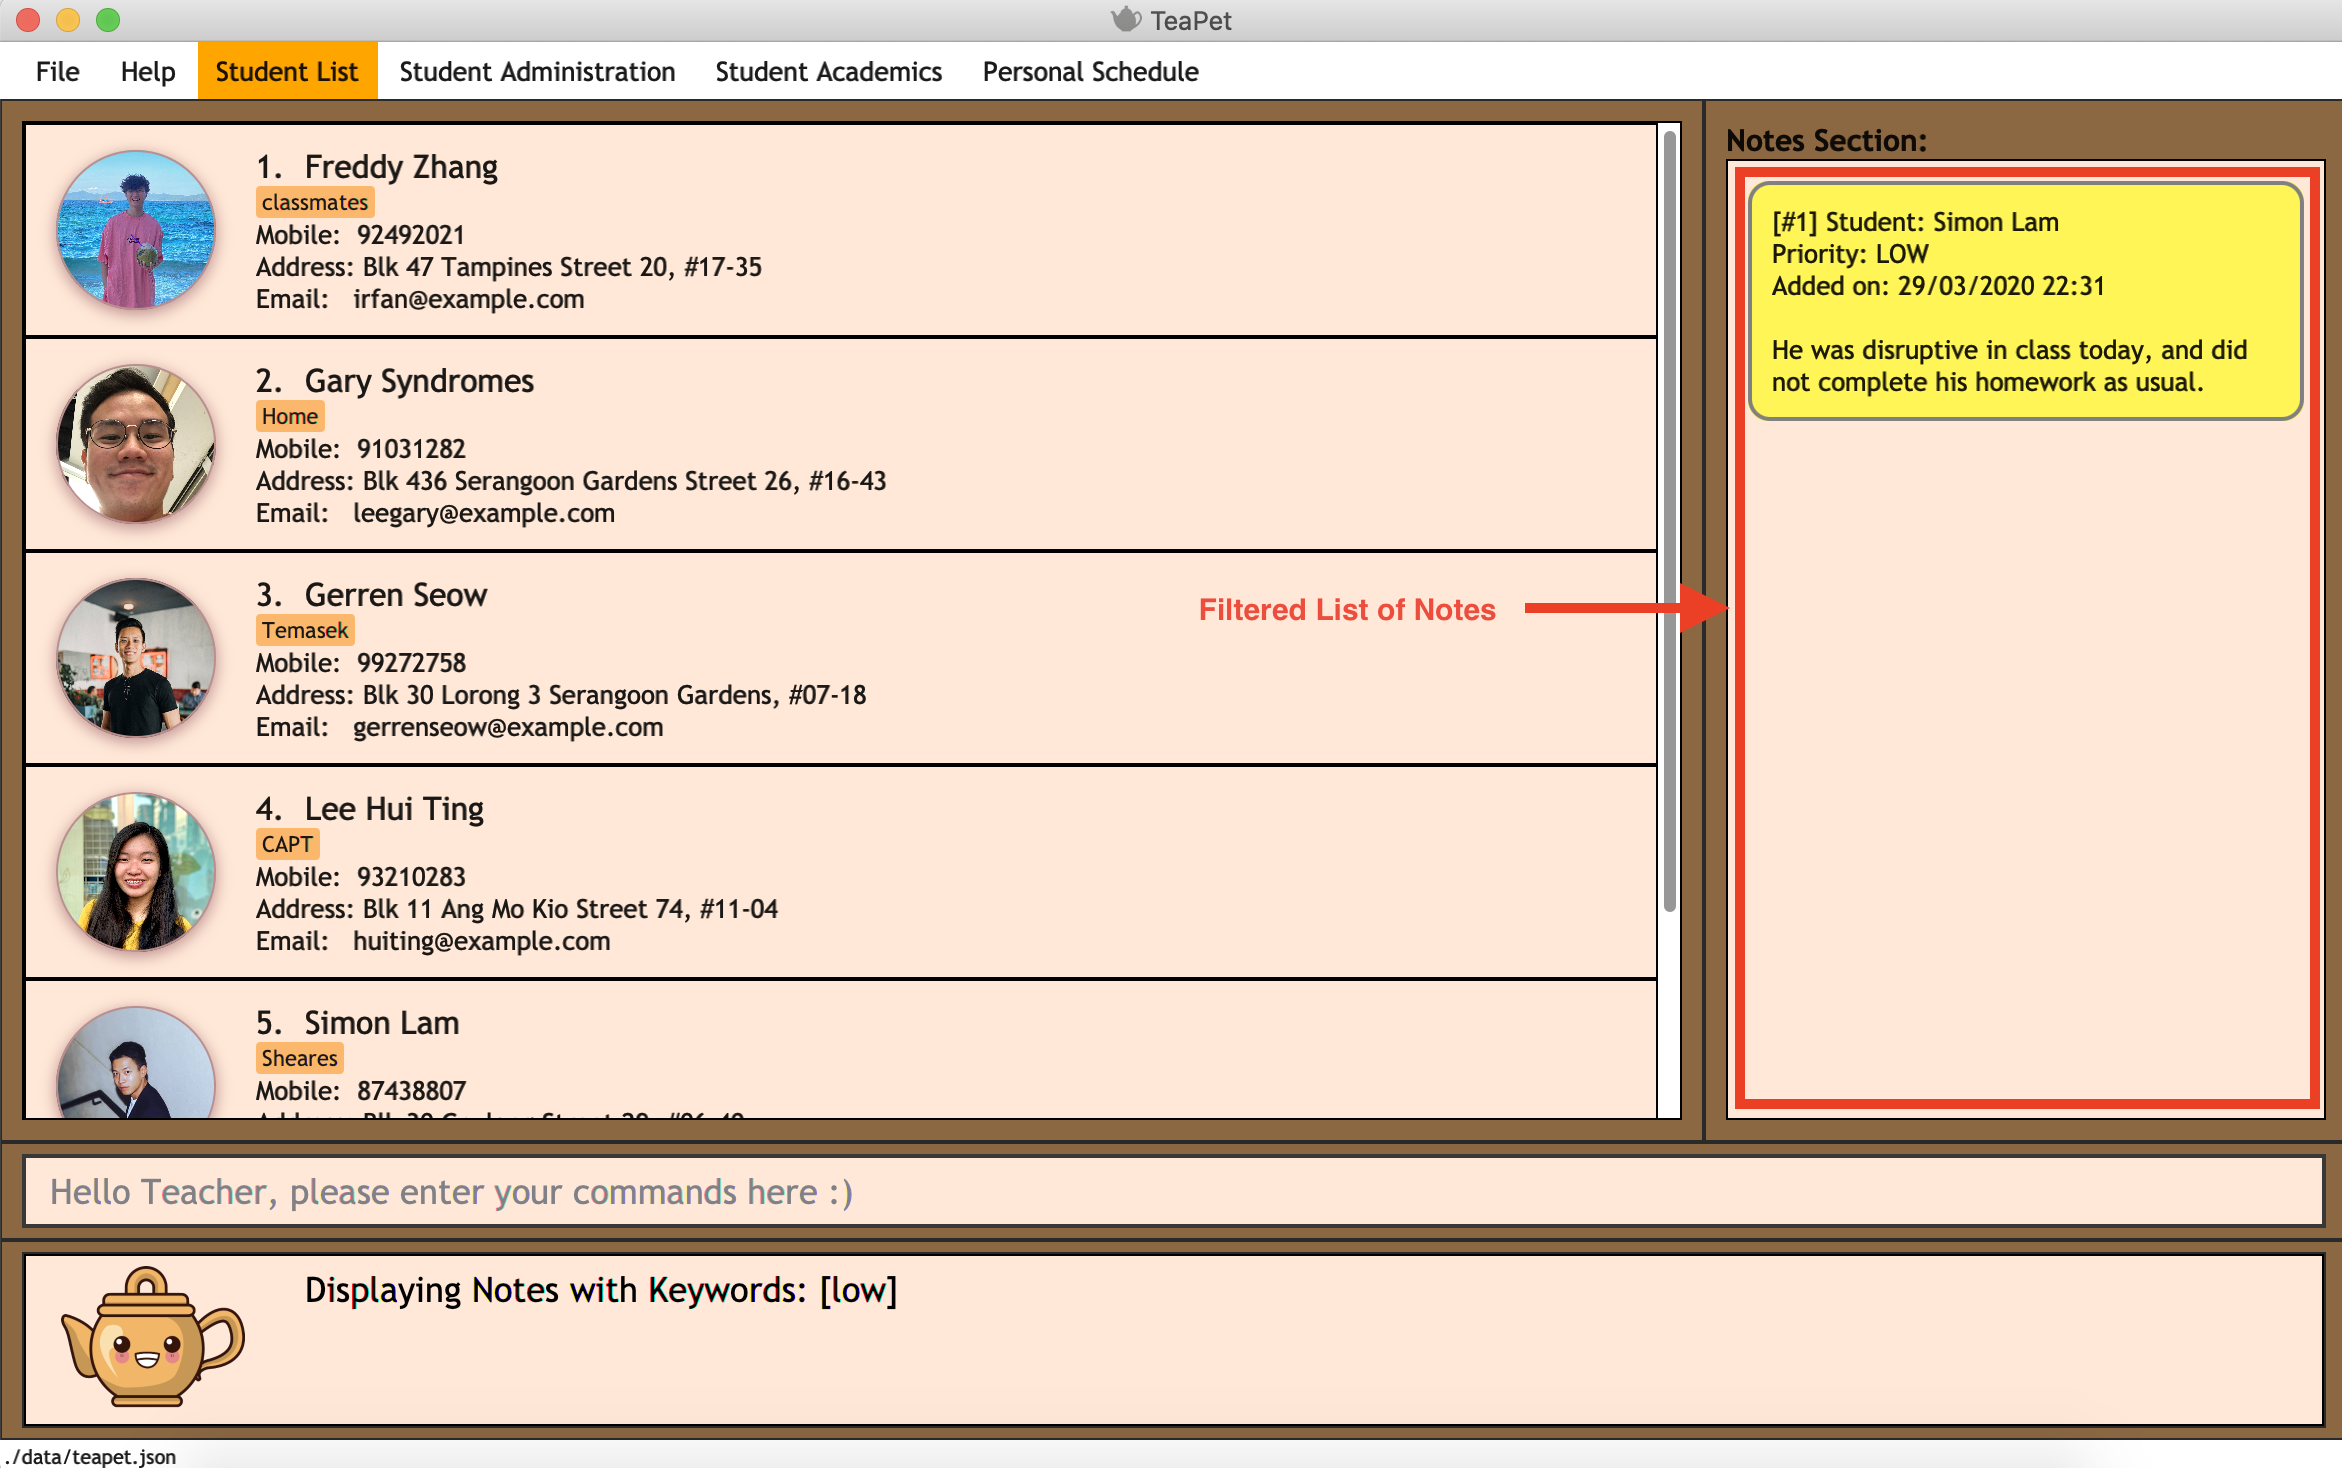
4.4.5. Filter Notes notes filter
Displays a list of filtered notes based on specific keywords.
Format:
notes filter KEYWORD(S)
-
Filters the list of notes based on the presence of keywords given.
-
This notes filter feature will perform a comparison of name of student, content, priority and timestamp of the notes.
-
Filtering is done based on character match, not full-word match.
Example 1:
-
notes filter low
Displays only notes with the keyword "low" present.
Expected Outcome:
Displaying Notes with Keywords: [low]
notes filter low commandExample 2:
-
notes filter high 29
Displays only notes with the keyword "high" and "29" present.
Expected Outcome:
Displaying Notes with Keywords: [high, 29]
4.4.6. Export Notes notes export
Exports all notes in TeaPet into a .csv file.
Format:
notes export
-
Exports all notes into studentNotes.csv, which can be located in the data folder of the same directory as the TeaPet application.
-
The .csv file’s column headers are Student, Priority, DateTime and Content, in that order.
Example:
-
notes export
Expected Outcome:
Notes are exported to studentNotes.csv in the data folder
4.5. Personal Scheduler [Done by Simon Lam and Gary Lim]
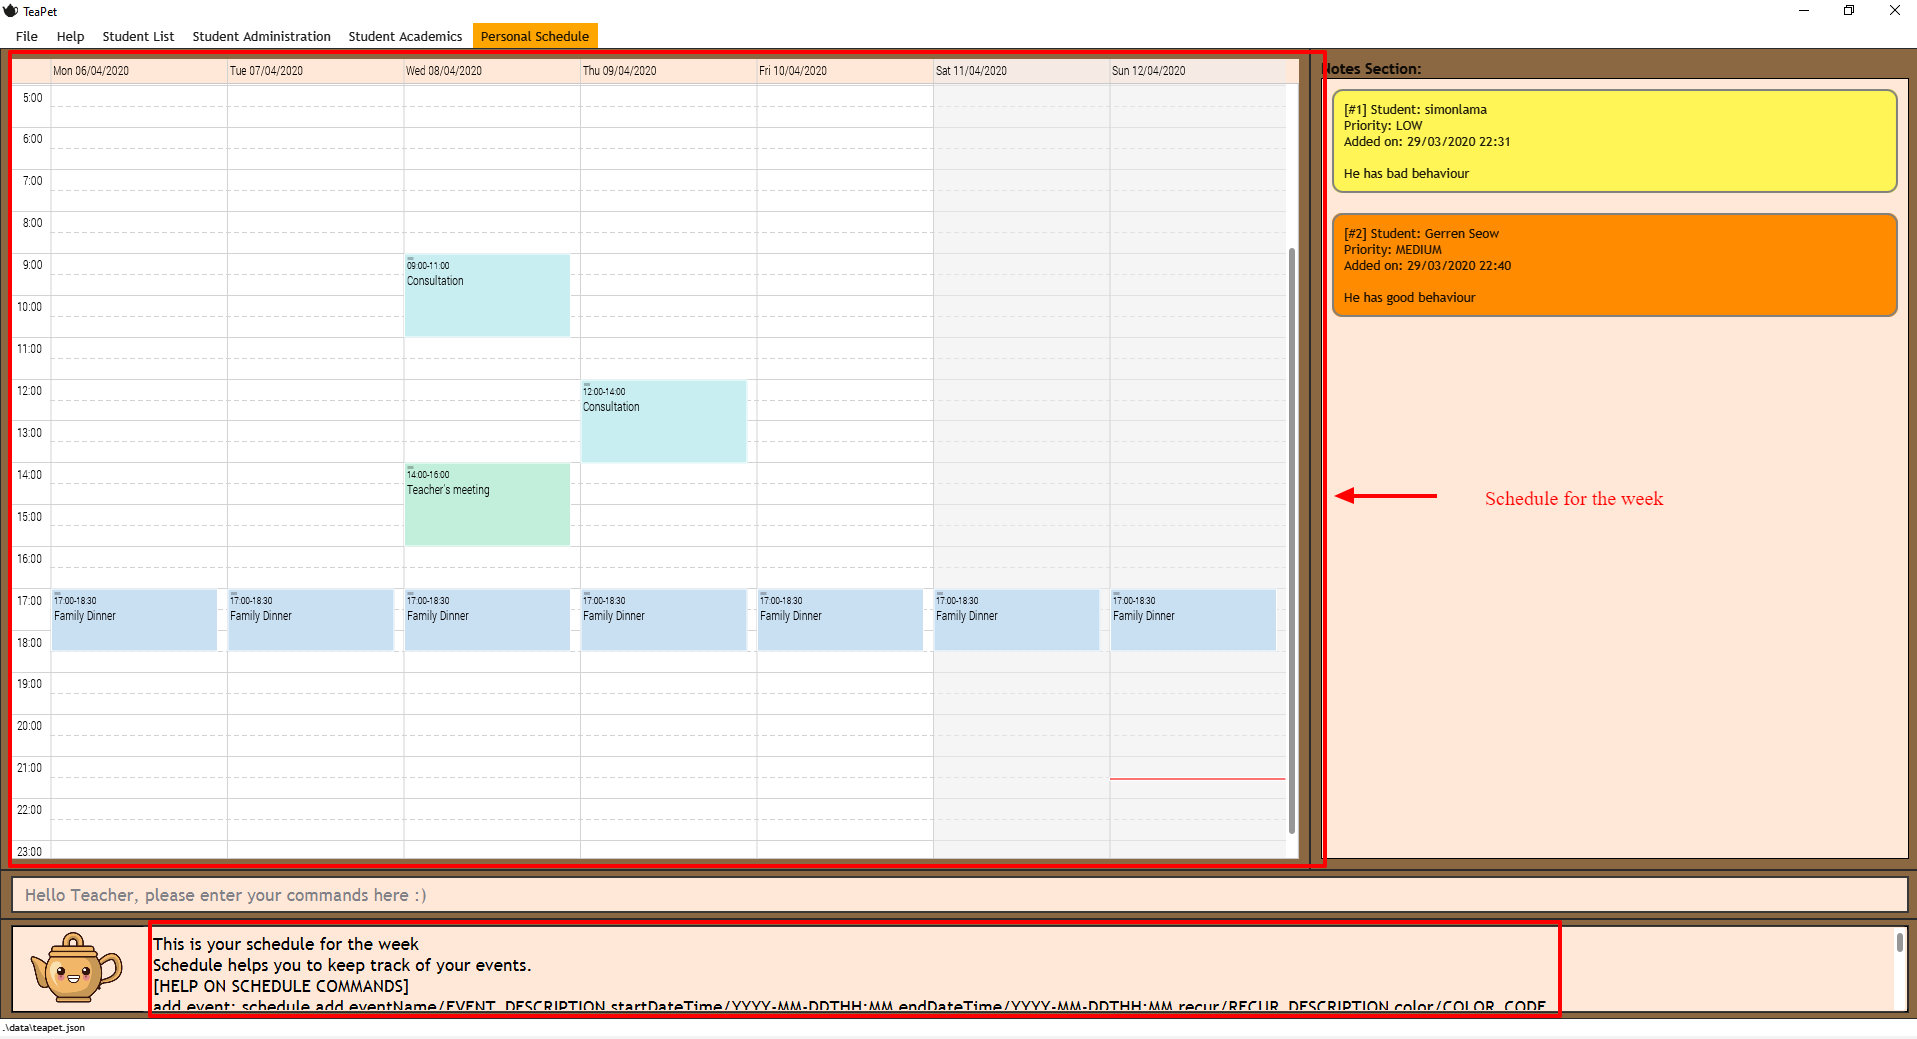
TeaPet’s Personal Scheduler allows you to record down your events, which will be sorted according to date and time. You will then be able to easily view your schedule as you need it.
4.5.1. Display your scheduler: schedule [Done by Simon Lam and Gary Lim]
Displays your schedule in this current week.
Format: schedule
Expected Outcome:
This is your schedule for the week
Schedule helps you to keep track of your events.
[HELP ON SCHEDULE COMMANDS]
add event: schedule add eventName/EVENT_DESCRIPTION startDateTime/YYYY-MM-DDTHH:MM endDateTime/YYYY-MM-DDTHH:MM recur/RECUR_DESCRIPTION color/COLOR_CODE
edit event: schedule edit INDEX [eventName/EVENT_DESCRIPTION] [startDateTime/YYYY-MM-DDTHH:MM] [endDateTime/YYYY-MM-DDTHH:MM] [recur/RECUR_DESCRIPTION] [color/COLOR_CODE]
delete event: schedule delete INDEX
get index of a event: schedule indexGet/EVENT_DESCRIPTION
get all indexes of events in schedule: schedule indexAll
change view mode of schedule: schedule view mode/SCHEDULE_MODE date/YYYY-MM-DD
export schedule: schedule export
Type the following commands for more info!
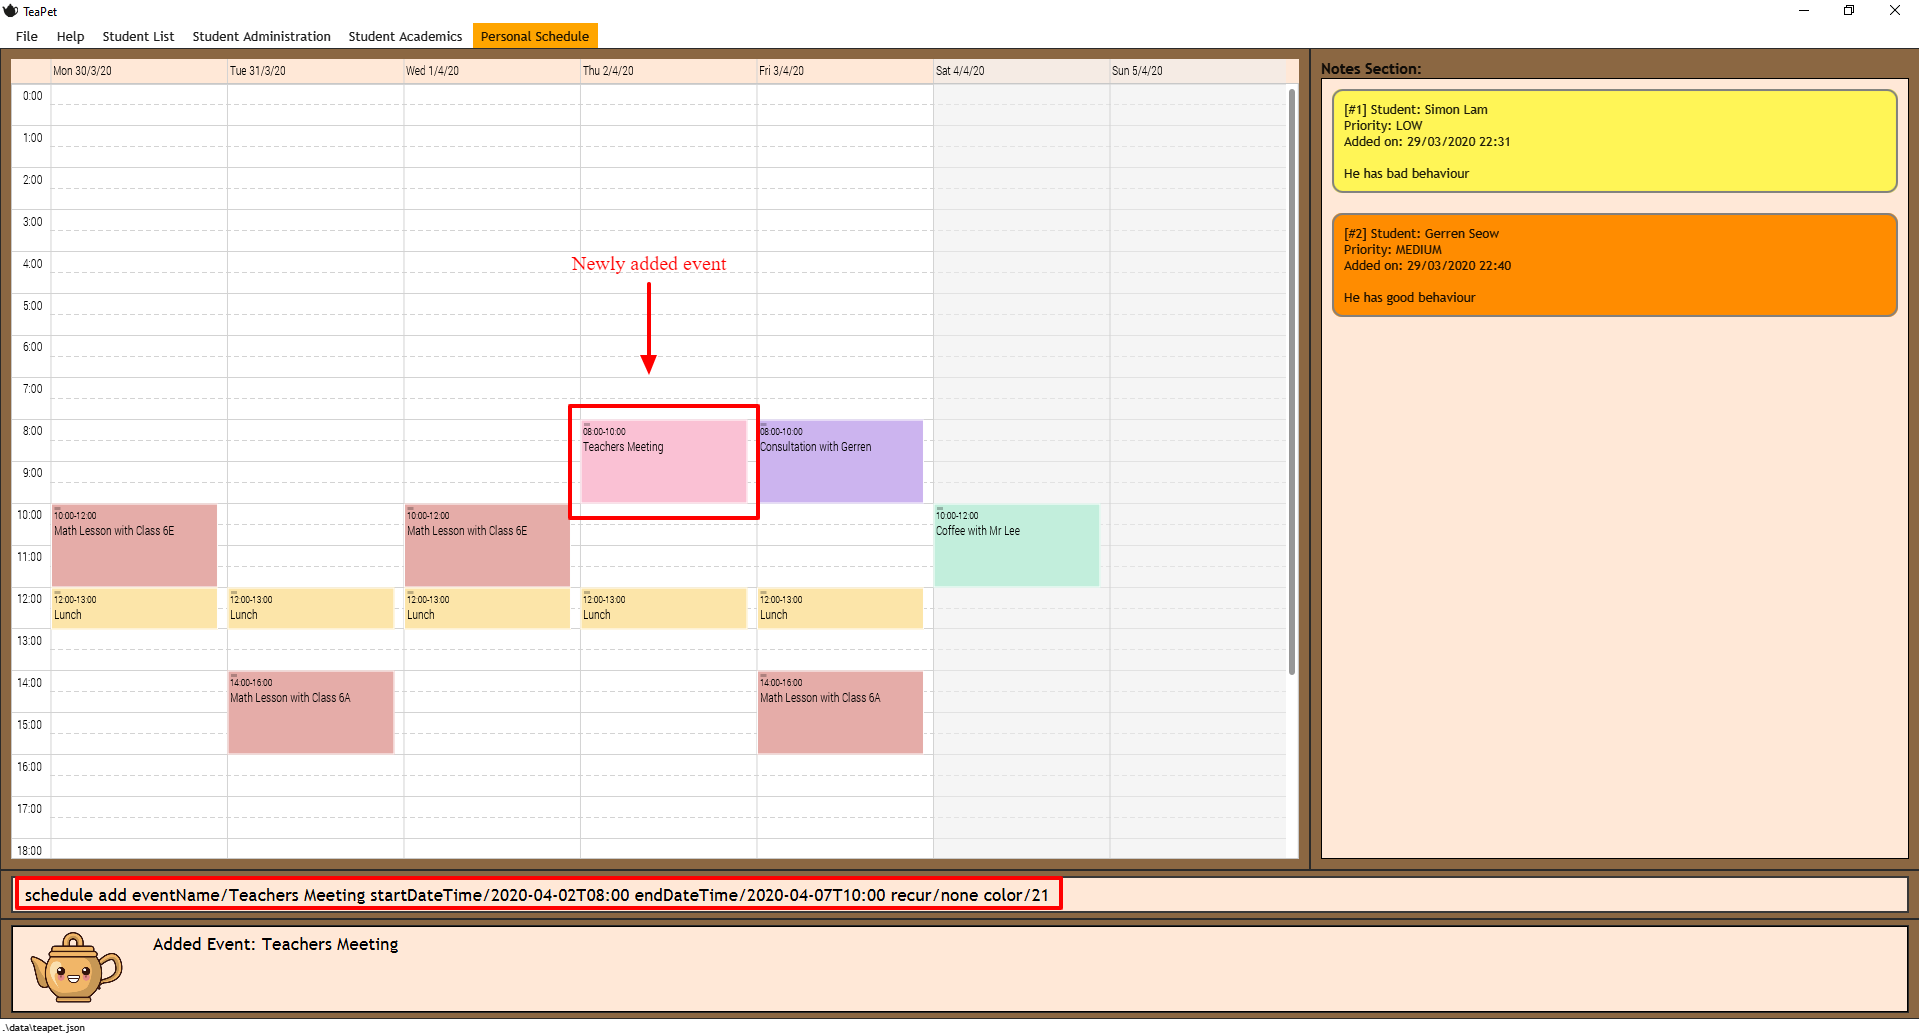
schedule command4.5.2. Adding an event to schedule: schedule add [Done by Simon Lam and Gary Lim]
Adds an event to your personal scheduler.
Format: schedule add eventName/EVENT_DESCRIPTION startDateTime/START_DATETIME endDateTime/END_DATETIME recur/RECUR_DESCRIPTION color/COLOR_CODE
|
The format of startDateTime and endDateTime is in YYYY-MM-DDThh:mm format, where time is in the 24-hour format. Example: 7th April 2020 10AM will be 2020-04-07T10:00 |
RECUR_DESCRIPTION can only be either of these: none, daily or weekly.
|
| Events which are further away in the future have a darker color code. This is intentional. |
| The prefixes are meant to be longer due the the emphasis on clarity as there are other features in this application which uses similar prefixes as well. |
|
COLOR_CODE is from 0 to 23 inclusive. |

Example:
-
Non-Recurring Event
schedule add eventName/Teachers Meeting startDateTime/2020-04-02T08:00
endDateTime/2020-04-07T10:00 recur/none color/21
Creates an event in the schedule with the description "Teachers Meeting" from "2nd Apr 2020, 0800" to "7th Apr 2020, 1000" with "no recurrence" and a color group of "21".
4.5.3. Editing an event in schedule: schedule edit [Done by Gary Lim]
Edits an event in your personal scheduler.
Format: schedule edit INDEX [eventName/EVENT_DESCRIPTION] [startDateTime/START_DATETIME] [endDateTime/END_DATETIME] [recur/RECUR_DESCRIPTION] [color/COLOR_CODE]
| INDEX is the index of the event that you wish to edit. This can be obtained using the indexGet Command. More details here |
| INDEX should be a positive integer and be a valid index. |
| You must edit at least 1 field. The rest of the fields are optional. |
|
The format of startDateTime and endDateTime is in YYYY-MM-DDThh:mm format, where time is in the 24-hour format. Example: 7th April 2020 10AM will be 2020-04-07T10:00 |
RECUR_DESCRIPTION can only be either of these: none, daily or weekly.
|
| Events which are further away in the future have a darker color code. This is intentional. |
| The prefixes are meant to be longer due the the emphasis on clarity as there are other features in this application which uses similar prefixes as well. |
| Use the indexGet/indexAll Command to check the index of the event before you edit to ensure you always correctly edit events. |
| COLOR_CODE is from 0 to 23 inclusive. Refer here for the colour codes |
Example:
-
schedule edit 2 eventName/Teachers Meeting
Edits event with index 2 in the schedule to the new description "Teachers Meeting".
Expected Outcome:
Successfully edited Event 2 into: Event Name: Teachers Meeting , Start DateTime: 2020-04-02T08:00 , End DateTime: 2020-04-07T10:00
4.5.4. Delete an event in schedule: schedule delete [Done by Gary Lim]
Deletes an event in your personal scheduler.
Format: schedule delete INDEX
| INDEX is the index of the event that you wish to delete. This can be obtained using the indexGet Command. More details here |
| INDEX should be a positive integer and be a valid index. |
| Use the indexGet/indexAll Command to check the index of the event before you delete to ensure you always correctly delete events. |
Example:
-
schedule delete 2
Deletes event with index 2 in the schedule.
Expected Outcome:
Deleted Event: Event Name: Teachers Meeting , Start DateTime: 2020-04-02T08:00 , End DateTime: 2020-04-07T10:00
4.5.5. Get index of an event in schedule: schedule indexGet [Done by Gary Lim]
Get the index of an event in your personal scheduler.
Format: schedule indexGet/EVENT_DESCRIPTION
|
EVENT_DESCRIPTION is the name of the event. In the unlikely event that you mistype the EVENT_DESCRIPTION, our smart application will help you find the closest matching event to the EVENT_DESCRIPTION that you entered |
| In the even more unlikely event that you type an EVENT_DESCRIPTION that does not match ANY of the events in the schedule, the event with index 1 will be shown. |
| Index is used to identify events and help you edit and delete events. |
Example:
-
schedule indexGet/consult
Gets the index of the event with the EVENT_DESCRIPTION "consult".
Expected Outcome:
Could not find specified event. This is the closest event we can find based on what you've entered:
Index: 5 - Event Name: Consultation , Start DateTime: 2020-03-30T08:00 , End DateTime: 2020-03-30T10:00
Example 2 :
-
schedule indexGet/consultation
Gets the index of the event with the EVENT_DESCRIPTION "consultation".
Expected Outcome:
Event found:
Index: 5 - Event Name: Consultation , Start DateTime: 2020-03-30T08:00 , End DateTime: 2020-03-30T10:00
4.5.6. Get all indexes of events in schedule: schedule indexAll [Done by Gary Lim]
Get all indexes of your events in your personal scheduler.
Format: schedule indexAll
| Index is used to identify events and help you edit and delete events. |
Example:
-
schedule indexAll
Gets all indexes of all events currently in your schedule.
Expected Outcome:
These are all the events in your scheduler:
 Index: 1 - Event Name: Consultation , Start DateTime: 2020-03-30T08:00 , End DateTime: 2020-03-30T10:00
 Index: 2 - Event Name: Consultation , Start DateTime: 2020-04-10T08:00 , End DateTime: 2020-04-10T10:00
 Index: 3 - Event Name: Family Dinner , Start DateTime: 2020-03-30T19:00 , End DateTime: 2020-03-30T20:00
4.5.7. Change view mode of schedule: schedule view [Done by Gary Lim]
Change the view mode of your Personal Schedule as how you need it.
Format: schedule view mode/SCHEDULE_MODE date/YYYY-MM-DD
SCHEDULE_MODE can only be of these: daily or weekly.
|
| Date is in YYYY-MM-DD format. |
Change the view mode to daily to help you see all the events you have on that day!
|
Example:
-
schedule view mode/daily date/2020-04-12
View all the events you have on "12th Apr 2020".
Expected Outcome:
Showing your daily schedule on reference date 2020-04-12
4.5.8. Export all events in schedule: schedule export [Done by Gary Lim]
Exports all events currently in schedule into a ".ics" file. The .ics file type can easily be used with Google Calendar and other calendar applications.
Format: schedule export
| The file will be exported into the data folder with the file name "mySchedule.ics". Every export command run replaces the existing file. |
Example:
-
`schedule export'
Exports all your events into the data folder with the file name "mySchedule.ics".
Expected Outcome:
Schedule is exported to mySchedule.ics in the data folder
4.6. Additional Features [Done by Simon Lam]
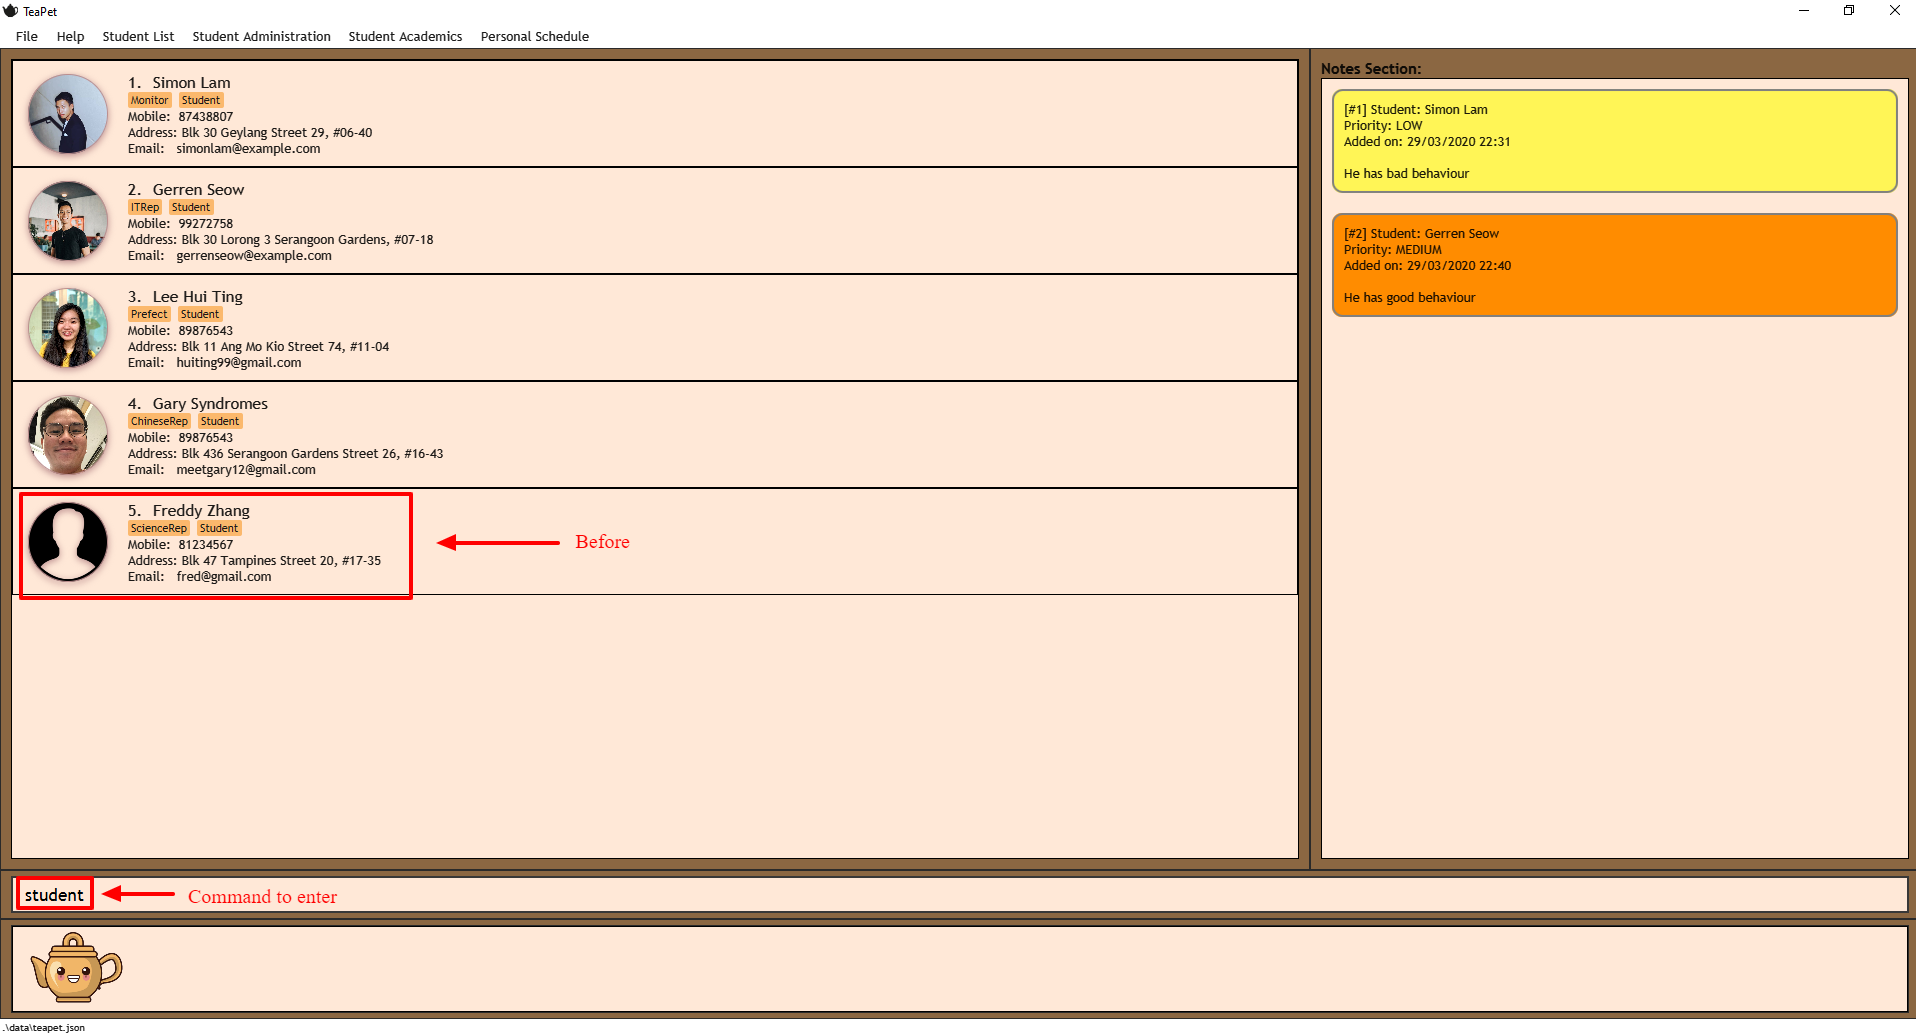
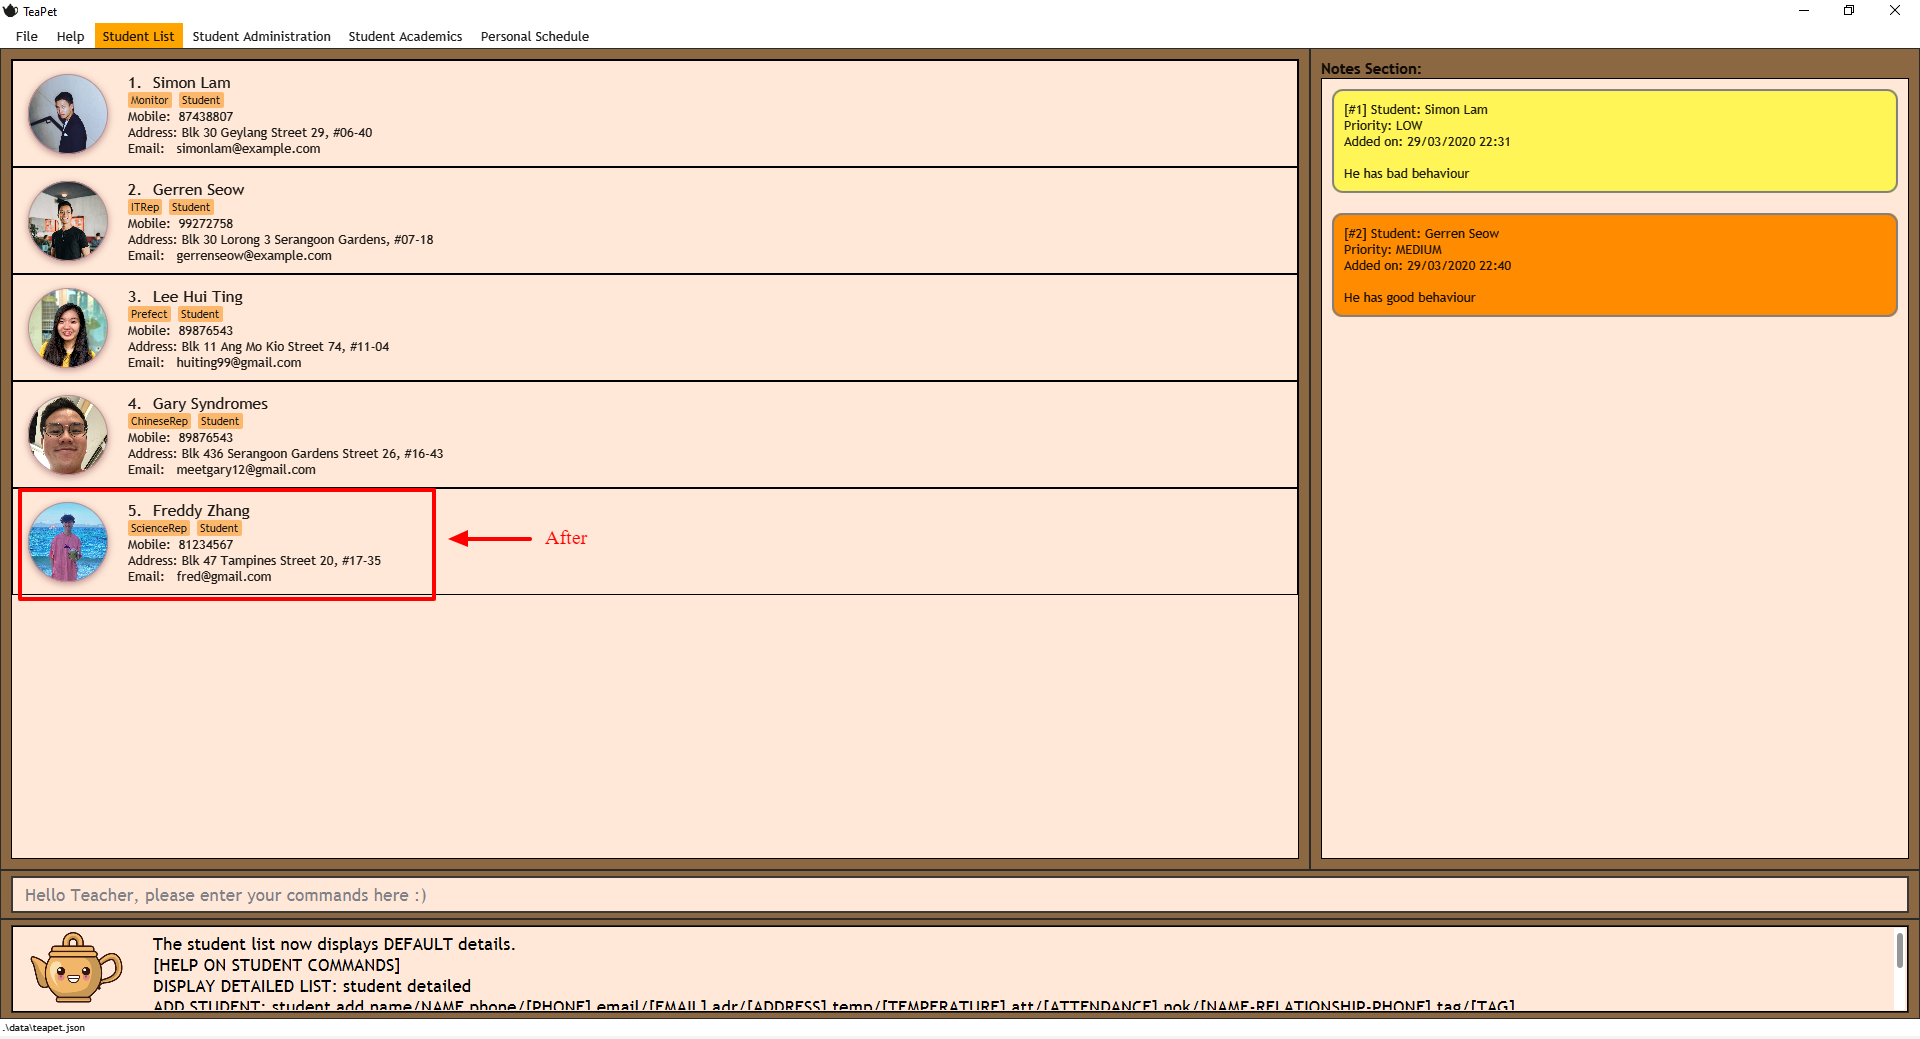
4.6.1. Update Profile Picture
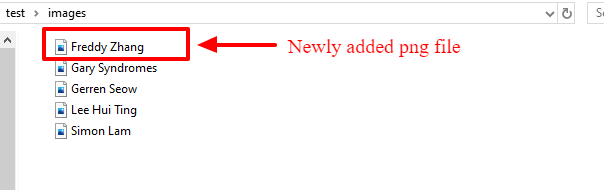
TeaPet’s student list allows you to upload image of your students into your application. The following steps will help you upload photos of your students into the student list.
Step 1. Locate the image folder. It is in the root directory folder!
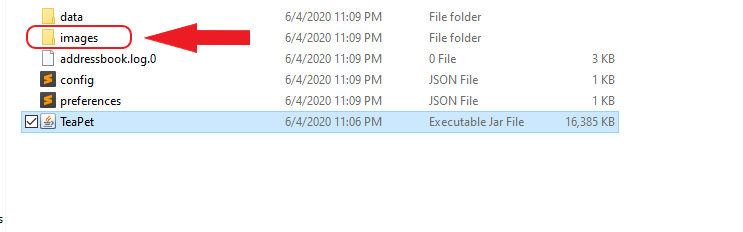
Step 2. Open the image folder and drag the image of your student into the folder.
|
The filename of your image must of this format: 1. Filename of the image must be the same as the student. 4. File is in .png format. For example, a student with name Simon Lam must have a image file with name Simon Lam in .png format. |
| For ideal optimization of the image, its dimensions for its length and width should be roughly equal. |
Step 3. Type in the student command in the user interface. TeaPet will update the images and
now you can see pictures of your students in your student list!
Editing the name of the student will change the student image back to the default image. To solve this, you have to edit
the png file in the Image folder as well after you edit the name of the student and then enter the student command.
|
4.6.2. All in one help window
Suppose you are lost and you need help regarding the many commands in TeaPet, you can easily type in help or simply
press your F1 key to bring up this user guide!
Format: help
Expected Outcome:
Opened help window.
5. Command Summary
This section provides a summary on all of the commands that we use in TeaPet.
5.1. Display Commands
Here are the default commands available for use. They do not require prefixes.
Command |
Format |
Expected outcome |
|
|
Opens up the User Guide |
|
|
Safely exits the application |
|
|
Displays the student list |
|
|
Displays all administrative details of the class |
|
|
Displays all academic records of the class |
|
|
Displays all notes of the class |
|
|
Displays your personal schedule |
5.2. Student Particulars Commands
Here are the commands to manage students. They require the prefix student.
Command |
Format |
Expected outcome |
|
|
Displays the detailed details of the class |
|
|
Adds a student into the class with the respective particulars |
|
|
Edits the student at the index with the respective particulars |
|
|
Deletes the student at the index |
|
|
Deletes the entire class list |
|
|
Searches through the class list and filter students whose names have the specified KEYWORD |
5.3. Student Administration Commands
Here are the commands to manage student administration. They require the prefix admin.
Command |
Format |
Expected outcome |
|
|
Shows the dates with admin information of the class |
|
|
Saves the most updated administrative information of the class as today’s date |
|
|
Fetches the administrative information of the class at the specified date |
|
|
Deletes the administrative information of the class at the specified date |
5.4. Student Academics Commands
Here are the commands to manage student academics. They require the prefix academics.
Command |
Format |
Expected outcome |
|
|
Adds an assessment into the academics list |
|
|
Edits an assessment in the academics list |
|
|
Deletes the assessment at the given index |
|
|
Submits student(s) work for the assessment at the given index |
|
|
Marks student(s) work and stores the scores for the assessment at the given index |
|
|
Displays either all homework or exam assessments in the academics list |
|
|
Displays the report for all assessments |
|
|
Exports the academics report into a .csv file |
5.5. Notes Commands
Here are the commands to manage notes. They require the prefix notes.
Command |
Format |
Expected outcome |
|
|
Adds a note into TeaPet |
|
|
Edits a note in TeaPet. |
|
|
Deletes a note in TeaPet. |
|
|
Displays a list of filtered notes based on presence of keywords. |
|
|
Exports all notes in TeaPet into a .csv file |
5.6. Personal Scheduler Commands
Here are the commands to manage scheduler. They require the prefix schedule.
Command |
Format |
Expected outcome |
|
|
Edits an event in your personal scheduler. |
|
|
Adds an event into the scheduler. |
|
|
Deletes an event in your personal scheduler. |
|
|
Get the index of an event in your personal scheduler. |
|
|
Get all indexes of your events in your personal scheduler. |
|
|
Change the view mode of your Personal Schedule as how you need it. |
|
|
Exports all events currently in schedule into a ".ics" file. The .ics file type can easily be used with Google Calendar and other calendar applications. |
6. Glossary [Done by Zhang Yuanyu]
The table below provides the prefixes used in certain commands. The definitions are provided for you to reference easier and have a better understanding of what they do.
| Prefix | Attributes | Used in the following Command(s) |
|---|---|---|
name/ |
Name of student |
|
phone/ |
Phone number |
|
email/ |
Email address |
|
adr/ |
Address |
|
tag/ |
Tag |
|
nok/ |
Next of Kin details |
|
temp/ |
Temperature |
|
att/ |
Attendance |
|
stu/ |
Student name and score obtained |
|
desc/ |
Assessment description |
|
type/ |
Assessment type |
|
date/ |
Date |
|
eventName/ |
Event name |
|
startDateTime/ |
Starting date and time of event |
|
endDateTime/ |
Ending date and time of event |
|
recur/ |
Recurring type |
|
color/ |
Color code |
|
indexGet/ |
Get index of event |
|
mode/ |
Event view mode |
|
cont/ |
Content of note |
|
pr/ |
Note priority level |
7. FAQ [Done by Zhang Yuanyu]
This section will provide answers to all Frequently Asked Questions by our users.
-
How do I transfer my data to another Computer?
Install the app in the other computer and overwrite the empty data file it creates with the file that contains the data of your previous TeaPet folder.
-
How do I transfer the information in TeaPet to the co-form teacher?
Right now, TeaPet does not support the transfer of data, but the feature will be coming soon in the near future!
-
Why can’t I see my personal schedule from a while back?
To see the schedule for a specific week, you could use the command
schedule view mode/weekly date/DATE, where date is one of the date in the week you are seeking for. -
How do I retrieve back all the class list in TeaPet if I accidentally cleared all the content?
Right now TeaPet does not support a backup feature, hence it would be best if you do not accidentally use the clear command. The backup feature will be coming soon in the near future!
-
TeaPet is not working on my computer. How do I fix it?
Ensure that your computer is running on Java 11 and not other versions. TeaPet does not support other versions of Java.
-
Sometimes the text size of TeaPet is too small. How do I fix it?
TeaPet runs best on full screen mode. Hence, it is strongly encouraged that you maximise the screen when using TeaPet for clarity.
-
Sometimes I forget the various commands to use, where can I find the list of commands?
You could view enter help tab by clicking F1, or by pressing the
helpbutton in the tabs section located at the top of TeaPet, which will then lead you to this user guide to provide you with the help you need!